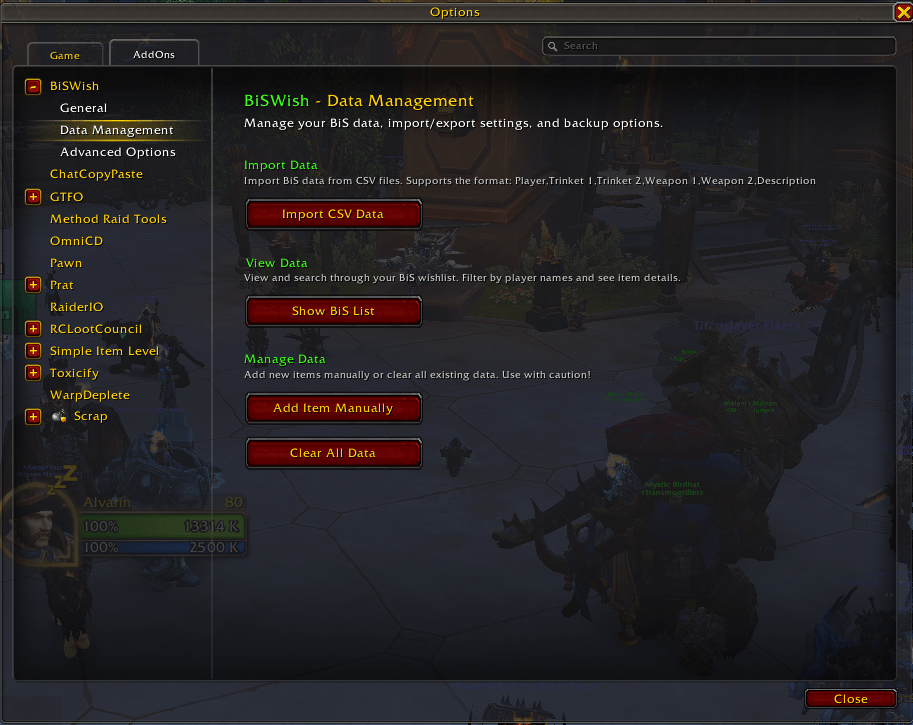
bis-data-management.png
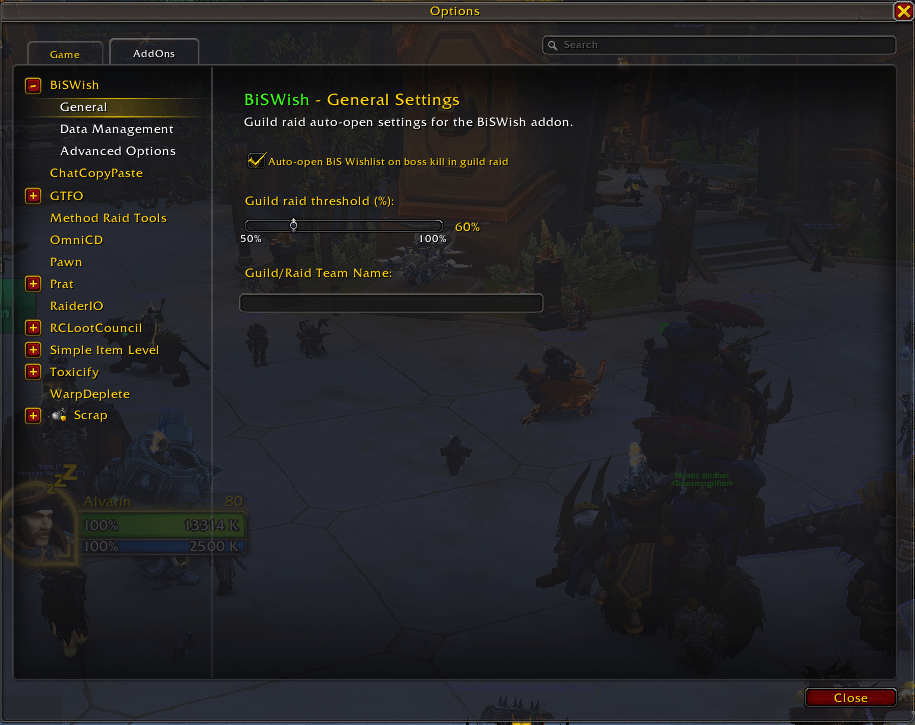
bis-general.png
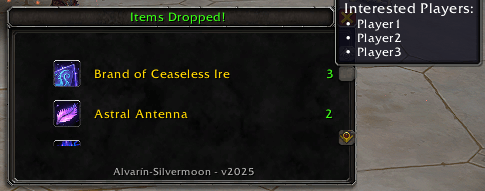
bis-lootdrop.png
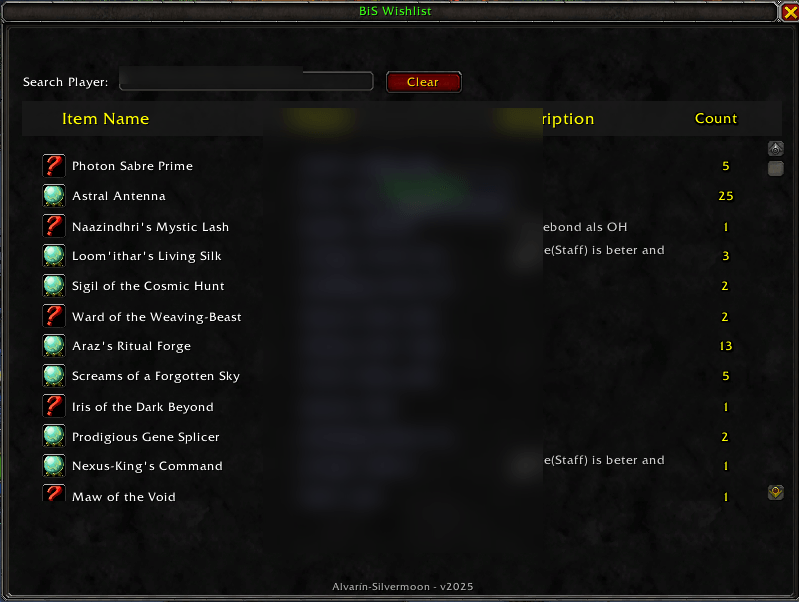
bis-wishlist_blurred.png
Description
BiSWish - Best in Slot Wishlist Addon
A World of Warcraft addon for managing and tracking Best in Slot (BiS) items for raid groups and guilds. Keep track of who wants what loot and automatically open your wishlist when guild raids kill bosses!
🎯 What Does It Do?
- Track BiS Items: Create wishlists for your raid group
- Import from Spreadsheets: Copy data from Google Sheets or Excel
- Auto-Open on Boss Kills: Automatically shows your wishlist during guild raids
- Guild Integration: Auto-detects and displays your guild name
- Smart Guild Detection: Automatically fills in your guild name when you open settings
- Easy Management: Add, edit, and remove items with a simple interface
🚀 Quick Start
- Install: Download and place in your AddOns folder
- Enable: Turn on in the WoW AddOns menu
- Configure: Go to Interface → AddOns → BiSWish
- Set Guild Name: Enter your guild/raid team name
- Import Data: Use the Data Management panel to import your spreadsheet
📖 How to Use
Commands
/bis- Open your BiS wishlist/bis help- Show help/bis data- Open data management window/bis options- Open settings/bis testdrop- Test item drop popup/bis debug- Toggle debug mode/bis debuglevel <1-5>- Set debug level
Settings
- General: Set your guild name and auto-open options
- Data Management: Import CSV data, view items, add items manually
- Advanced: Debug mode for troubleshooting
- Auto-Fill Guild Name: Click the "Auto-fill" button to automatically detect your guild name
Importing Data
CSV Format
Your spreadsheet should be formatted as: Player,Trinket 1,Trinket 2,Weapon 1,Weapon 2,Description
Example CSV data:
Player,Trinket 1,Trinket 2,Weapon 1,Weapon 2,Description
John,Ashes of Al'ar,Bloodthirsty Instinct,Thunderfury,Shadowmourne,Main tank
Sarah,Whisper of the Nathrezim,Satyr's Lash,Corrupted Ashbringer,Glaive of Azzinoth,DPS
Mike,Reins of the Raven Lord,Swift Razzashi Raptor,Thunderfury,Shadowmourne,Healer
Step-by-Step Import Process
- Prepare your data: Format your spreadsheet with the correct columns
- Copy the data: Select all rows (including headers) and copy to clipboard
- Open Data Management: Type
/bis dataor go to Settings → BiSWish → Data Management - Import CSV: Click "Import CSV Data" button
- Paste and Import: Paste your data and click "Import"
- Verify: Check that all items and players were imported correctly
Linking Player Data
After importing CSV data, you need to link the player data to create the wishlist:
- Open Data Management: Use
/bis datacommand - Go to Link Data tab: Click on "Link Data" in the interface
- Link Players to Items:
- Select a player from the dropdown
- Select an item they want
- Click "Link Player to Item"
- Repeat for all player-item combinations
- Verify Links: Check the "Linked Data" tab to see all connections
- Test: Open your BiS list (
/bis) to see the linked data
CSV Import Tips
- Use exact item names: Make sure item names match exactly (case-sensitive)
- Include all columns: Even if some are empty, keep the column structure
- Check for typos: Double-check player names and item names
- Use commas: Separate values with commas, not semicolons
- No spaces: Avoid extra spaces around commas
Best Practices for CSV Data
- Consistent naming: Use the same format for all player names (e.g., "PlayerName" or "Player-Name")
- Item names: Use the exact item names as they appear in-game
- Empty cells: Leave cells empty rather than filling with "N/A" or "None"
- Special characters: Avoid using quotes, apostrophes, or other special characters
- Data validation: Double-check your data before importing to avoid errors
Complete Example CSV
Copy this example and replace with your own data:
Player,Trinket 1,Trinket 2,Weapon 1,Weapon 2,Description
Tankwarrior,Ashes of Al'ar,Bloodthirsty Instinct,Thunderfury,Shadowmourne,Main tank
Healpriest,Whisper of the Nathrezim,Satyr's Lash,Corrupted Ashbringer,Glaive of Azzinoth,Healer
Dpsmage,Reins of the Raven Lord,Swift Razzashi Raptor,Thunderfury,Shadowmourne,DPS
Rogueplayer,Deathcharger's Reins,Fiery Warhorse's Reins,Corrupted Ashbringer,Glaive of Azzinoth,DPS
Hunterplayer,Ashes of Al'ar,Bloodthirsty Instinct,Thunderfury,Shadowmourne,DPS
How to use this example:
- Copy the entire CSV block above
- Replace the player names with your raid members' names
- Replace the item names with the actual items they want
- Keep the header row exactly as shown
- Make sure each player has their desired items listed
- Save as a .csv file or paste directly into the import dialog
CSV Format Requirements
- Header row: Must include
Player,Trinket 1,Trinket 2,Weapon 1,Weapon 2,Description - Player names: Use exact character names (case-sensitive)
- Item names: Use exact item names as they appear in-game
- Separators: Use commas (,) to separate values
- Empty cells: Leave empty if a player doesn't want that item type
Loot Tracking & Item Drop Popups
How Loot Tracking Works
When you're in a raid and loot drops, the addon automatically:
- Scans all loot items in the loot window
- Checks your wishlist for matching items
- Shows popup notifications for items that raid members want
- Displays interested players for each wanted item
Example Loot Scenario
Raid drops:
- Thunderfury (Legendary Sword)
- Ashes of Al'ar (Mount)
- Bloodthirsty Instinct (Trinket)
Your wishlist has:
- Tankwarrior wants: Thunderfury
- Healpriest wants: Ashes of Al'ar
- Dpsmage wants: Bloodthirsty Instinct
Result: The addon shows a popup with:
🎉 Wanted Items Detected!

⚔️ Thunderfury (Legendary Sword)
   👤 Tankwarrior wants this item

🐎 Ashes of Al'ar (Mount)
   👤 Healpriest wants this item

💎 Bloodthirsty Instinct (Trinket)
   👤 Dpsmage wants this item
Loot Tracking Settings
- Auto-open on boss kill: Automatically opens BiS list during guild raids
- Guild raid threshold: Set percentage of guild members required (default: 80%)
- Popup duration: How long popups stay visible (default: 30 seconds)
Importing Loot Data via CSV
You can also import loot data directly via CSV to populate your item database:
Loot CSV Format:
ItemID,ItemName,ItemType,Description
19019,Thunderfury,Weapon,Legendary sword from Molten Core
32458,Ashes of Al'ar,Mount,Legendary mount from Tempest Keep
19950,Zandalar Hero Charm,Trinket,Trinket from Zul'Gurub
Complete Loot CSV Example:
ItemID,ItemName,ItemType,Description
19019,Thunderfury,Weapon,Legendary sword from Molten Core
32458,Ashes of Al'ar,Mount,Legendary mount from Tempest Keep
19950,Zandalar Hero Charm,Trinket,Trinket from Zul'Gurub
19948,Bloodthirsty Instinct,Trinket,Trinket from Zul'Gurub
19947,Nat Pagle's Broken Reel,Trinket,Trinket from Zul'Gurub
19946,Tidal Charm,Trinket,Trinket from Zul'Gurub
19945,Foror's Crate of Endless Resist Gear,Trinket,Trinket from Zul'Gurub
19944,Peel of the Gorilla,Trinket,Trinket from Zul'Gurub
19943,Mass of McGowan,Trinket,Trinket from Zul'Gurub
19942,Hand of Justice,Trinket,Trinket from Blackrock Depths
How to import loot data:
- Prepare your CSV: Use the format above with ItemID, ItemName, ItemType, Description
- Get item IDs: Use
/bis debugto find item IDs in-game - Import: Go to Data Management → Import CSV Data
- Paste and import: Paste your loot CSV data
- Verify: Check that all items were imported correctly
Finding Item IDs
To get the correct item IDs for your CSV:
Method 1: In-game item tooltip
- Hold Shift and hover over any item
- Look for the item ID in the tooltip
- Copy the ID number
Method 2: Using debug mode
- Type
/bis debugto enable debug mode - Type
/bis debuglevel 5for verbose output - Hover over items to see their IDs in chat
Method 3: Online databases
- Visit WoW databases like Wowhead or WowDB
- Search for the item name
- Copy the item ID from the URL or item page
Example item ID lookup:
- Thunderfury: Item ID 19019
- Ashes of Al'ar: Item ID 32458
- Bloodthirsty Instinct: Item ID 19948
Testing Loot Tracking
Use the command /bis testdrop to test the loot popup system with sample data.
🎨 Features
- Smart Icons: Automatically shows the right item icons
- Search & Filter: Find items and players quickly
- Tooltips: Hover over items to see details
- Guild Integration: Auto-opens during guild raids
- Auto-Detect Guild: Automatically detects and fills your guild name
- Loot Tracking: Automatically detects when wanted items drop
- Item Drop Popups: Shows notifications when raid members want dropped loot
- Persistent Data: All your data is saved between sessions
- Debug System: Built-in debug mode for troubleshooting
🐛 Troubleshooting
Addon not working?
- Make sure it's enabled in the AddOns menu
- Try typing
/reloadin-game - Check that your guild name is set in settings
Import not working?
- Make sure your CSV format is correct
- Check that all columns are filled properly
- Try copying and pasting the data again
- Verify item names are exact (case-sensitive)
- Check for hidden characters or extra spaces
Players not linking to items?
- Make sure you've imported the CSV data first
- Check that player names match exactly
- Verify that items exist in the database
- Use the "Link Data" tab to manually link players to items
- Check the "Linked Data" tab to see current connections
CSV import errors?
- Ensure your spreadsheet uses commas (,) as separators
- Don't use semicolons (;) or other characters
- Make sure all rows have the same number of columns
- Check for empty cells - use empty strings instead
- Verify your data doesn't contain special characters that break parsing
Loot tracking not working?
- Make sure you're in a raid or party when loot drops
- Check that your wishlist has items linked to players
- Verify that item names in your wishlist match exactly with dropped items
- Try the
/bis testdropcommand to test the popup system - Ensure the addon is enabled and not conflicting with other addons
Popup notifications not showing?
- Check that you have items in your wishlist
- Verify that players are properly linked to items
- Make sure the popup duration setting is not set to 0
- Try reloading the addon with
/reload - Check debug mode for any error messages
Guild name not showing?
- Go to Settings → BiSWish → General
- Click the "Auto-fill" button next to the guild name field
- Or manually enter your guild/raid team name
- The name will appear in your BiS list
Need help debugging?
- Type
/bis debugto enable debug mode - Use
/bis debuglevel <1-5>to set debug verbosity - Check the chat for debug messages
📝 Version History
Version 1.1
- Added auto-detect guild name functionality
- Added "Auto-fill" button for guild name detection
- Enhanced debug system with configurable levels
- Improved settings integration
- Better error handling and user feedback
Version 1.0
- Initial release
- BiS wishlist management
- CSV import from spreadsheets
- Guild raid auto-open
- Settings integration
- Smart icon matching
🎮 Requirements
- WoW Version: Dragonflight (10.2.7+)
- Dependencies: None
- Languages: English
BiSWish - Keep track of your raid loot wishes! 🗡️
The BishWish Team