FATE: Zero TLS rpg
- By
They have the power... they can do anything! They can accomplish anything... Majins capable of achieving and destroying everything.
1001390211.png
Description
FATE: zero ADDON — WISHES, LUCK & CONSEQUENCES
By TheLegendsStudius | Minecraft Bedrock Add-on
Discord: https://discord.gg/CwVNXCDPXC
«“Three wishes. Three powers. One mortal brave enough to challenge fate.”»
Welcome to FATE: zero, where fortune is more than a reward — it is a power you can nurture, spend your life chasing, and lose in a single reckless gamble.
Gather the dust of distant stars. Bargain with the flames of purgatory. Follow the whisper of the moon. Summon ancient Majins, earn their favor, and claim weapons that turn every battle into a contest between ambition and consequence.
But these beings are not simply merchants waiting to hand you power. Serve them long enough, and a different path opens: the right to challenge the very forces that answered your wishes.
Will you accept what destiny gives you — or draw your blade against it?
📜 CURRENT PACK — V1.0.0
The supplied packs declare version 1.0.0. Their feature set includes:
- Three Majins: Odrikandalarrai, Helphinakadarau, and Selenakadarai.
- Persistent Luck System: Influences fate rolls, resource opportunities, and specific weapon mechanics.
- Paid Wishes & 36 Requests: Divided among three Majins and three difficulty tiers.
- Three Legendary Weapons: Each with selectable abilities, a cinematic ultimate, and its own mystical defense.
- Three-Hit Combat Combos: With weapon- and blade-mode-specific finishers.
- Three-Phase Boss Encounters: Featuring teleportation, warning zones, Aegis barriers, and interactive trials.
- Nine Fly Variants: Normal, Swift, and Elite forms across the stellar, infernal, and lunar families.
- Six World Events: From meteor showers to infernal invasions.
- Extensive Crafting System: Recipes, consumable charms, power artifacts, shards, and cores.
- Custom Assets: Models, particles, animations, and sound effects supporting all three themes.
🧭 TUTORIAL — THE FIRST BARGAIN
«“Before you command destiny, you must learn what it demands.”»
Your journey does not begin with a class selection or an attribute roll. It begins in survival: gathering resources, discovering strange creatures, and learning how to approach the beings beyond the bottle.
PHASE 1 — READ YOUR FORTUNE
Bottle of Luck — The Measure of Possibility
Use a Bottle of Luck to display your current Luck value. Keep it in your inventory while defeating eligible mobs for a chance to gain additional Luck.
- Luck begins at 1 and is capped at 100.
- Successful kill-based gains are small, allowing fortune to grow gradually.
- Certain charms, absorbed materials, quests, and boss victories provide additional gains.
- Death reduces your current Luck by 10%, without lowering it below the minimum.
Crafting Recipe:
- 5 Ghast Tears
- 3 Glowstone Blocks
- 1 Glass Bottle
The Bottle of Luck is a reusable fortune reader, not a summoning bottle.
PHASE 2 — GATHER THE THREE ESSENCES
THE OVERWORLD — THE STELLAR PATH
Collect StarDust and Destiny Shards. Hunt StarDust Flies and watch for meteor showers and stellar gatherings.
THE NETHER — THE INFERNAL PATH
Collect Purgatory Essence and Hell Shards. Hunt Hell Flies, gather falling embers, and confront invaders emerging from infernal rifts.
THE END — THE LUNAR PATH
Collect Moon Dust and Moon Shards. Hunt Moon Flies and seek the resources carried by lunar rainfall.
Eligible melee hits also have a chance to provide the resource associated with your current dimension. Carrying its matching Luck item improves this gathering opportunity and enables rare summoning-bottle materialization.
PHASE 3 — FORGE A SUMMONING BOTTLE
Each summoning recipe combines a Glass Bottle with four matching shards and four matching resources.
Summoning Item| Required Materials| Majin Summoned Bottle of Destiny| 4 Destiny Shards + 4 StarDust + 1 Glass Bottle| Odrikandalarrai Bottle of Purgatory| 4 Hell Shards + 4 Purgatory Essence + 1 Glass Bottle| Helphinakadarau Bottle of Moon| 4 Moon Shards + 4 Moon Dust + 1 Glass Bottle| Selenakadarai
Place the shards in the four corners, the Glass Bottle in the center, and the matching resource in the four remaining slots of a crafting table.
RARE MATERIALIZATION METHOD
Keep StarDust Destiny Luck, Burning Luck, or Moon Luck in your inventory while landing eligible hits in its matching dimension.
A summoning bottle may materialize, but the booster can lose its glow and be consumed.
- Cooldown: 10 minutes.
PHASE 4 — MEET THE MAJIN
Use the matching bottle to begin a summoning sequence. The bottle is consumed as energy travels into a portal and the Majin emerges.
Hit the friendly Majin, or interact with it where supported, to open its menu. In this state, hitting it opens a conversation rather than beginning the boss battle.
Each player can have one active Majin session. That Majin serves its summoner; another player cannot take over its dialogue.
AVAILABLE INTERACTIONS:
- Ask for a Boon: Pay materials for a wish, item, event, or legendary weapon.
- Accept a Request: Complete a task for resources, Luck, and additional time.
- Challenge the Majin: Unlock a boss encounter through completed summons.
- Dismiss the Majin: End the meeting before its time expires.
Every summon allows three completed wishes or requests in total. You can combine paid boons and completed tasks within that limit.
PHASE 5 — EARN THE RIGHT TO REBEL
Complete all three wishes or requests during five summons of the same Majin to unlock its challenge — 15 completed interactions for that Majin.
Simply summoning and dismissing it does not count as a completed invocation.
Once unlocked, challenge it through the menu. Completing a qualifying summon can also offer a final opportunity to fight before it leaves.
«“The bottle opens the door. Your choices decide what stands on the other side.”»
🔮 THE MAJINS — THREE POWERS BEYOND THE BOTTLE
ODRIKANDALARRAI — THE VOICE OF STELLAR DESTINY

«“Mortal… the stars brought me to you.”»
Odrikandalarrai brings the power of stars into your world: fortune, cosmic resources, and a blade that turns combat into a gamble with life itself.
- Theme: Stellar Destiny.
- Currency: StarDust.
- Summoning Item: Bottle of Destiny.
- Initial Meeting Duration: 240 seconds.
- Extra Time per Paid Wish: 30 seconds.
- Extra Time per Completed Request: 45 seconds.
- Signature Weapon: Fiery Death Game Blade.
- Boss Core: Cosmic Core.
Its boons include fate rolls, random stellar artifacts, Stellar Fate Events, Destiny Shards, and the Fiery Death Game Blade.
FOR PLAYERS WHO ENJOY: Fortune-building, unpredictable combat, and the thrill of a reward that may arrive with a curse attached.
HELPHINAKADARAU — THE WILL OF PURGATORY

«“So it shall be. But hell always collects.”»
Helphinakadarau offers power without comfort. Its gifts burn, its fate rolls carry greater danger, and its weapon rewards those willing to feed the flames — even when those flames begin consuming their wielder.
- Theme: Infernal Power.
- Currency: Purgatory Essence.
- Summoning Item: Bottle of Purgatory.
- Initial Meeting Duration: 150 seconds.
- Extra Time per Paid Wish: 20 seconds.
- Extra Time per Completed Request: 30 seconds.
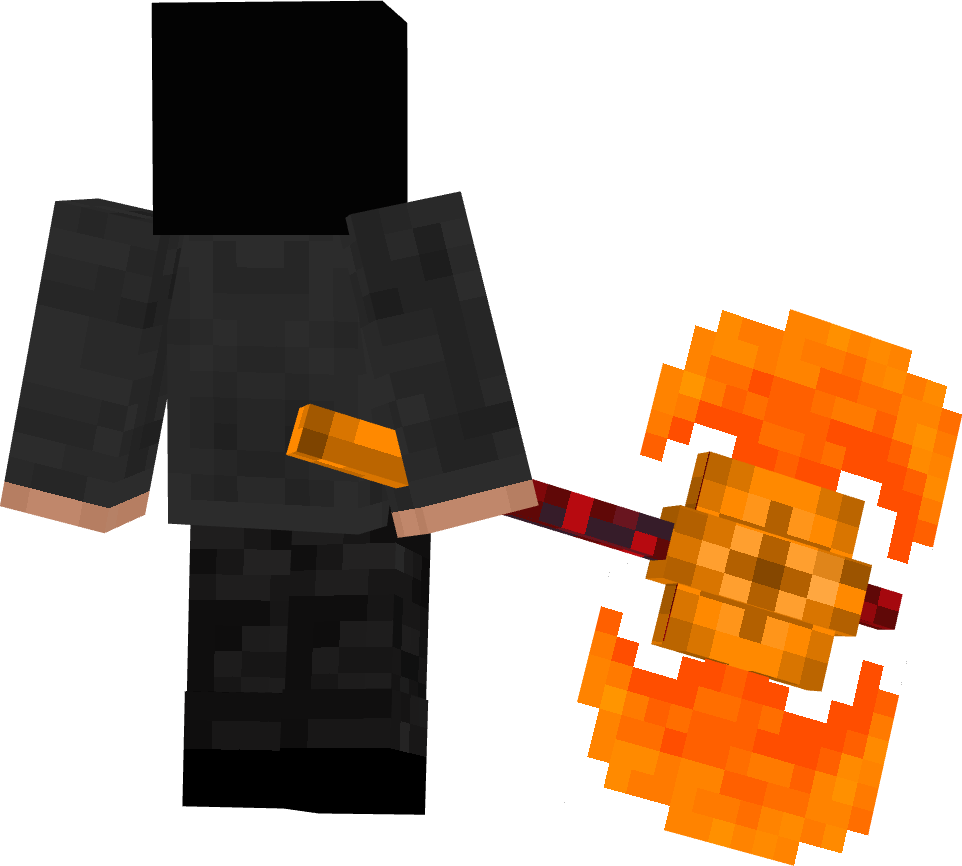
- Signature Weapon: Calamity Battle Axe.
- Boss Core: Inferno Core.
Its boons include risky fate rolls, infernal artifacts, the Hell Heart, Infernal Fate Events, Hell Shards, and the Calamity Battle Axe.
FOR PLAYERS WHO ENJOY: Aggressive area damage, burning attacks, and power that must be managed before it becomes self-destruction.
SELENAKADARAI — THE WHISPER BENEATH THE ECLIPSE

«“Tell me what your heart desires… but choose carefully.”»
Selenakadarai commands lunar grace and the pressure of the void. Its gifts favor movement, recovery, and the ability to drag enemies into a battlefield shaped by gravity.
- Theme: Moonlight and Lunar Gravity.
- Currency: Moon Dust.
- Summoning Item: Bottle of Moon.
- Initial Meeting Duration: 200 seconds.
- Extra Time per Paid Wish: 25 seconds.
- Extra Time per Completed Request: 40 seconds.
- Signature Weapon: Lunar Scythe.
- Boss Core: Moon Core.
Its boons include lunar fate rolls, random lunar artifacts, Lunar Fate Events, Moon Shards, and the Lunar Scythe. Its random-item wish can also trigger a Chaos Event instead of giving an item.
FOR PLAYERS WHO ENJOY: Teleportation, life recovery, piercing attacks, and controlling enemy movement.
WARNING: Standing too close to a friendly Majin exposes you to its slowing and weakening aura. Keep a little distance while planning your next request.
🍀 LUCK — THE POWER THAT BENDS THE ODDS
«“Luck is not a promise. It is a chance to make the impossible hesitate.”»
Luck connects the add-on's gathering, gambling, and combat systems.
HIGHER LUCK CAN:
- Improve the weighting of beneficial fate outcomes.
- Reduce the weighting of bad and catastrophic outcomes.
- Improve selected resource-drop opportunities and bottle-materialization chances.
- Increase scripted fly-spawn opportunities and the nearby fly population cap.
- Enable scripted Elite Fly spawns from 25 Luck onward.
- Reduce the self-risk in Death Game's coin-based branches.
- Improve the blade's Jackpot finisher chance and Strength Game buff scaling.
FATE OUTCOME CATEGORIES
EPIC — THE IMPOSSIBLE GIFT
Rare treasures, powerful blessings, valuable materials, and dramatic rewards.
GOOD — FORTUNE SMILES
Equipment, healing, resources, experience levels, and useful effects.
NEUTRAL — DESTINY HESITATES
Strange encounters, brief movement effects, weather changes, and harmless surprises.
BAD — THE PRICE OF AMBITION
Weakness, hunger, hostile visitors, lost Luck, and other setbacks.
CATASTROPHIC — FATE COLLECTS
Lightning, timed explosions, dangerous enemies, curses, and severe Luck losses.
The Luck value is shown with a percentage sign in-game, but it is not a universal success percentage. Different systems use different formulas. Even high Luck does not guarantee a safe gamble.
📜 REQUESTS — FAVOR MUST BE EARNED
«“A wish buys power. A trial proves you deserve it.”»
The three Majins offer 36 defined requests — 12 per Majin, spread across three tiers. More demanding tiers become available as completed summons and interactions accumulate.
REQUEST TYPES:
- Hunting: Defeat specific enemies or hostile monsters.
- Offerings: Deliver the requested materials.
- Wave Trials: Defeat a summoned group.
- Travel: Walk the required distance.
- Mining: Break the specified blocks or ores.
Only one request can be active at a time. Complete it while your Majin remains available; abandoning a request removes 15 seconds from the meeting.
STELLAR REQUESTS
Hunt monsters and skeletons, mine coal and iron, make precious offerings, defeat Endermen, or endure summoned Husk trials.
Examples: Stellar Hunt, Pilgrimage, Night of Skeletons, Celestial Host, Eyes of the Void, Great Journey.
INFERNAL REQUESTS
Break netherrack, mine quartz, fight Blazes and Wither Skeletons, and offer the materials of the Nether.
Examples: Scorched Earth, Blaze Ambush, Living Fire, Infernal Horde, Dark Skeletons, Burning Rods.
LUNAR REQUESTS
Gather pearls and amethyst, break end stone, fight Endermen and Phantoms, and survive Vindicator trials.
Examples: Pearls of the Night, Stone of the Void, Violet Eyes, Lunar Court, Shadows of the Sky, Lunar Pilgrimage.
TIER REWARDS
Tier| Rewards Tier 1| 8–16 matching resources and +0.5 Luck Tier 2| 20–32 matching resources, 1 matching shard, +1 Luck, and a chance of an extra Fate Event Tier 3| 36–56 matching resources, 2 matching shards, +2 Luck, and chances of a charm and an extra Fate Event
Completed requests also extend the meeting and count toward its three-interaction limit.
🏪 THE PRICE OF A WISH — A LIVING BARGAIN
«“Ask again, and the price remembers.”»
Repeated wishes and completed requests make the next boon more expensive.
- Each completed interaction raises the price level by 20 percentage points.
- The ordinary currency multiplier is capped at 3× the base price.
- Price heat remains unchanged for six minutes after the latest interaction.
- After that, it cools by half a price step per minute until the base price returns.
- Defeating a Majin grants 35% off the currency portion of boons during your next five summons of that Majin.
Only the first cost — the Majin's currency — scales. Additional ingredients remain fixed.
The menu displays your current price level and the actual materials required. Do not assume that the price of a previous wish is the price of your next one.
🗡️ LEGENDARY WEAPONS — THREE WAYS TO DEFY DESTINY
«“These weapons do not merely strike. They decide how the battle will be remembered.”»
Hold Sneak + Use to cycle a weapon's mode. Use it without sneaking to activate the selected ability.
- Fiery Death Game Blade: Five regular modes + Ultimate.
- Calamity Battle Axe: Five regular modes + Ultimate.
- Lunar Scythe: Six regular modes + Ultimate.
FIERY DEATH GAME BLADE — THE GAMBLER'S JUDGMENT

«“A coin turns. A card falls. Someone pays.”»
The Fiery Death Game Blade transforms the battlefield into a game of fortune, sacrifice, and sudden reversals.
REGULAR MODES:
- Death Game Mode: A dangerous verdict that can devastate the target or kill its wielder. Additional branches include Mercy, Soul Harvest, Fate Reflection, Cursed Pact, and Double Flip. Luck lowers the self-risk in its coin-based checks, but does not remove the danger. Add-on bosses receive reduced scripted damage rather than an automatic execution.
- Luck Game Mode: Spend 2 StarDust to trigger a random blade fate outcome, ranging from Epic to Catastrophic.
- Strength Game Mode: Receive a bundle of combat buffs or inflict debuffs on enemies around the target area.
- Drain Mode: Damage and wither the target while granting regeneration and absorption to the wielder.
- Chaos Mode: Let the blade choose another regular mode's ability, subject to available targets and resources.
ULTIMATE — FINAL GAME
Rise amid spectral blades, race through a circle of falling swords, and dive into a final stellar impact. The concluding strike restores health and grants additional protection.
- Cost: 8 StarDust.
- Cooldown: 2 minutes.
- Mystical Defense: Destiny Barrier.
- Third-Hit Finishers: Coin Verdict, Jackpot, Titanic Strike, Soul Harvest, and Chaos Roulette, depending on the blade variant.
BASE-PRICE BOON REQUIREMENTS:
- 256 StarDust.
- 1 StarDust Meteor.
- 1 StarDust Power.
- 1 StarDust Destiny Luck.
- 5 Netherite Blocks.
The StarDust cost changes with the current price multiplier.
WHO SHOULD WIELD IT: Players who want unpredictable victories — and understand that a death game can choose either side.
CALAMITY BATTLE AXE — THE FURNACE OF WAR
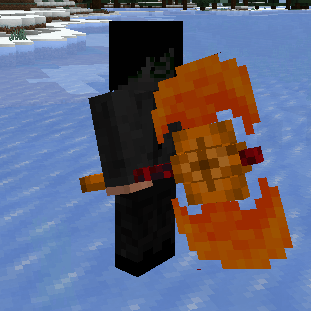
«“Feed the fire. Break the battlefield. Know when to stop.”»
The Calamity Battle Axe is built around heavy impact, sweeping flames, and the temptation of escalating power.
REGULAR MODES:
- Hell Mode: Consume Purgatory Essence in recurring pulses to build strength, speed, and resistance. Higher power raises the material demand and eventually damages the wielder. Use the ability again to end the mode.
- Shockwave: Leap into a heavy area strike that damages and launches nearby enemies.
- Hell Beam: Charge and release an aim-tracking infernal beam reaching up to 15 blocks, damaging and burning enemies in its path.
- Infernal Spin: Unleash four surrounding slash pulses that burn and push enemies away.
- Infernal Meteor: Spend 2 Purgatory Essence to call a fiery impact at the aimed position.
ULTIMATE — HELL'S APOCALYPSE
Radiating fissure effects mark the ground. Fire pillars erupt. The wielder ascends into a circular flight as meteors strike, gathers an infernal sphere overhead, and plunges into a devastating final impact.
- Cost: 4 Purgatory Essence.
- Cooldown: 2 minutes.
- Mystical Defense: Infernal Wall.
- Third-Hit Finisher: Infernal Execution.
BASE-PRICE BOON REQUIREMENTS:
- 256 Purgatory Essence.
- 1 Hell Heart.
- 1 Netherite Axe.
- 1 Burning Luck.
- 5 Netherite Blocks.
The Essence cost changes with the current price multiplier.
WHO SHOULD WIELD IT: Aggressive fighters who enjoy area pressure and can resist the urge to keep Hell Mode burning forever.
LUNAR SCYTHE — THE REAPER BENEATH THE ECLIPSE
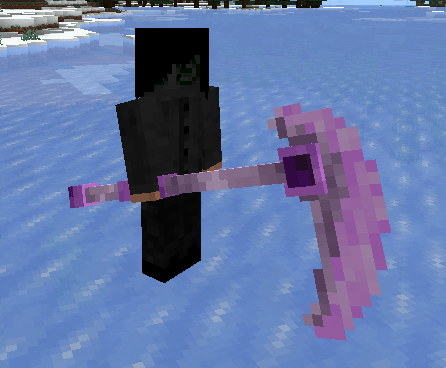
«“The moon does not chase its enemies. It draws them closer.”»
The Lunar Scythe combines reach, recovery, teleportation, and gravitational control.
REGULAR MODES:
- Moonbeam: Release a lunar attack reaching 22 blocks, followed by a detonation at its end. Successful hits can restore the wielder's health.
- Crescent Fan: Send three crescent waves forward in a spreading fan.
- Eclipse: Create a gravitational pull that draws enemies inward before a damaging implosion; successful hits can heal the wielder.
- Lunar Step: Teleport up to 10 blocks along a clear path, damaging enemies along the route and releasing a nova at the destination.
- Reaper's Harvest: Perform three spinning area attacks that recover health from successful hits.
- Moonfall: Call five lunar comets onto and around the aimed position.
ULTIMATE — LUNAR DOMINION
A dark moon forms overhead. A gravity well pulls enemies inward as the wielder circles through spiral and figure-eight flight. Reaping rings and falling comets lead into a final lunar collapse, healing, and protective buffs.
- Cost: 8 Moon Dust.
- Cooldown: 2 minutes.
- Mystical Defense: Lunar Veil.
- Third-Hit Finisher: Reaper's Crescent.
BASE-PRICE BOON REQUIREMENTS:
- 256 Moon Dust.
- 1 Moon Luck.
- 8 Eyes of Ender.
- 5 Netherite Blocks.
The Moon Dust cost changes with the current price multiplier.
WHO SHOULD WIELD IT: Tactical players who want mobility, crowd control, and health recovery woven into their attacks.
🛡️ MYSTICAL DEFENSE — HOLD YOUR GROUND
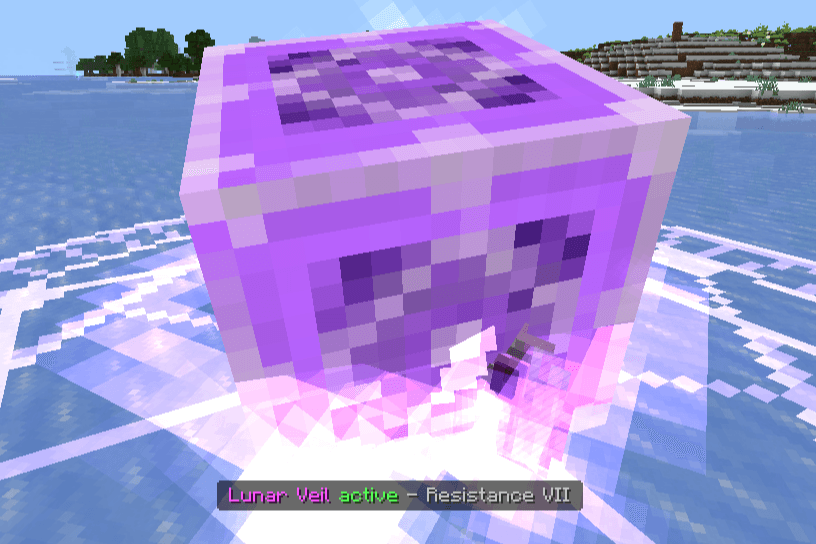
«“Sometimes the strongest answer is to refuse the blow.”»
Hold a legendary weapon and remain sneaking for approximately three seconds, without switching modes, to charge its mystical shield.
Switching modes interrupts this process. Release Sneak and hold it again to begin a fresh guard charge.
While active, the shield follows the wielder and provides strong protection, with weapon-specific pulses:
- Destiny Barrier: Stellar pulses damage and repel nearby enemies.
- Infernal Wall: Close-range pulses damage, burn, and push enemies away.
- Lunar Veil: Nearby enemies are slowed and weakened; their presence supports light healing.
Release Sneak to burst the active shield into an area counterattack. The infernal burst burns; the lunar burst adds debuffs and restores a little health.
Defense is not separate from your weapon's identity. It is another expression of it.
⚔️ COMBAT COMBOS — THE THIRD STRIKE MATTERS
Legendary weapons track a three-hit sequence. Keep the hits flowing — the sequence resets after a gap of approximately 2.5 seconds.
The third hit releases a distinctive finisher:
- Coin Verdict: A stellar judgment with Wither and slowing effects.
- Jackpot: A slot-style outcome that may produce an enhanced area strike and rewards.
- Titanic Strike: A heavy shockwave that launches nearby enemies.
- Soul Harvest: Repeated life-draining pulses.
- Chaos Roulette: A randomly selected Nova, Black Hole, or Cursed Coin effect.
- Infernal Execution: A fire-column execution with surrounding damage.
- Reaper's Crescent: Rotating lunar slashes, an inward pull, and health recovery.
These finishers supplement the weapon's ordinary hits and selected abilities. Different scripted attacks also use different damage values against add-on bosses.
🌠 POWER ARTIFACTS — CARRY THE REALMS INTO BATTLE
«“Not every treasure must become a weapon. Some become the power behind it.”»
STARDUST POWER — STELLAR MOMENTUM
Consume StarDust to gain movement and mining buffs. Larger reserves improve the activation tier and can add defensive or healing effects.
Sneak + Use: Spend 2 StarDust for a forward stellar dash with brief protection.
HELL POWER — INFERNAL FURY
Consume Purgatory Essence for strength, fire resistance, and movement buffs. Larger reserves unlock stronger tiers and additional benefits.
Sneak + Use: Spend 2 Purgatory Essence for a burning dash that damages nearby enemies along the advance.
MOON POWER — LUNAR GRACE
Consume Moon Dust for speed, jumping, slow falling, and night vision. Larger reserves can add resistance and regeneration.
Sneak + Use: Spend 2 Moon Dust for a clear-path Lunar Step of up to 9 blocks.
THE THREE METEOR ARTIFACTS
- StarDust Meteor: Spend 8 StarDust to scatter ten small stellar impacts across a broad area.
- Hell Meteor: Spend 6 Purgatory Essence to summon a colossal infernal impact, followed by fragments and lingering area damage.
- Moon Meteor: Spend 8 Moon Dust to call six comets in a closing ring, followed by a central impact with pulling and levitation effects.
These artifacts are separate from the axe's Infernal Meteor mode and the scythe's Moonfall ability.
HELL HEART — A DANGEROUS PULSE
Spend 1 Purgatory Essence to awaken the Hell Heart for 30 seconds. Its recurring strength effects scale with your remaining Essence reserve; larger reserves can add fire resistance and regeneration.
At extreme reserves, the heart also applies Wither. More fuel does not always mean safer power.
💎 MATERIALS, CHARMS & CORES — USE THEM OR SAVE THEM
«“Every fragment is a choice: consume it now, or forge something greater.”»
DUST AND ESSENCE
These resources are currencies, ingredients, and consumables:
- StarDust: Use for haste and speed; Sneak + Use spends four for absorption and resistance.
- Purgatory Essence: Use for fire resistance and strength; Sneak + Use spends four for a damaging Ring of Fire.
- Moon Dust: Use for night vision, slow falling, and jumping; Sneak + Use spends four for absorption, regeneration, and invisibility.
SHARDS — FRAGMENTS OF THE THREE POWERS
Destiny Shard, Hell Shard, and Moon Shard are valuable crafting materials. Sneak + Use consumes one for +0.4 Luck and a theme-specific buff.
Preserve them if you are still working toward your next summoning bottle.
LUCK ITEMS — FORTUNE WITH TWO PURPOSES
StarDust Destiny Luck, Burning Luck, and Moon Luck can remain in your inventory as dimensional bottle-materialization boosters.
Alternatively, Sneak + Use consumes one for +3 Luck and a short thematic benefit. Absorbing it means giving up that copy's gathering role.
CHARMS — A BLESSING YOU CAN CARRY
- StarDust Charm: Consumed for +2 Luck, regeneration, and haste.
- Ember Charm: Consumed for fire resistance and strength.
- Moon Charm: Consumed for +2 Luck, night vision, slow falling, and regeneration.
Charms are consumables, not permanently equipped accessories.
CORES — THE TROPHY OF DEFIANCE
Earn matching cores by defeating the Majins. Sneak + Use consumes a core to activate its benefits.
- Cosmic Core: Speed, jump boost, resistance, and a shorter regeneration effect.
- Inferno Core: Strength, fire resistance, and resistance.
- Moon Core: Night vision, absorption, slow falling, and a shorter regeneration effect.
The main listed buffs last three minutes, while regeneration has a shorter duration where present. Each core also triggers a brief thematic combat aura: stellar links, nearby burning pressure, or lunar slowing and healing.
🪰 FLIES — SMALL CREATURES, VALUABLE FORTUNE
«“Do not overlook the smallest light in the darkness.”»
Each resource family has three fly forms:
Family| Normal| Swift| Elite Stellar| StarDust Fly| Swift StarDust Fly| Elite StarDust Fly Infernal| Hell Fly| Swift Hell Fly| Elite Hell Fly Lunar| Moon Fly| Swift Moon Fly| Elite Moon Fly
Defeating flies rewards nearby players with matching resources, with chances of matching Luck items and shards.
- Normal Flies: Basic resource opportunities with possible bonus drops.
- Swift Flies: An additional chance of extra dust or essence.
- Elite Flies: Tougher targets with 5–9 matching resources, improved special-drop opportunities, and +0.5 Luck for nearby rewarded players.
Higher Luck supports more scripted fly encounters, but nearby population limits keep those spawns bounded.
🌌 WORLD EVENTS — WHEN DESTINY ENTERS YOUR WORLD
«“The realms do not wait for you to open a bottle.”»
World events can occur during exploration. Their selection depends on the dimension, with Luck influencing how often an opportunity is rolled. Some can also be triggered through fate outcomes.
METEOR SHOWER — GIFTS WITH AN IMPACT
Stellar meteors fall nearby, leaving StarDust and occasionally Destiny Shards. Warning effects reveal the danger, but anyone caught near an impact can be hurt.
INFERNAL RIFT — CLOSE THE BREACH
Blazes and Wither Skeletons emerge in a timed invasion. Defeat the invaders within 90 seconds to receive Purgatory Essence, +1 Luck, and a chance of a Hell Shard.
EMBER RAIN — GATHER THE FALLING FLAME
Purgatory Essence falls around the player, with occasional Hell Shards among the embers.
FLY SWARM — FORTUNE TAKES WING
A group of Swift Flies and an Elite Fly appears, matching the current dimension's resource family.
LUCKY STARS — A STELLAR GATHERING
StarDust Flies gather alongside an Elite StarDust Fly, creating another opportunity to collect stellar materials.
MOONFALL — RESOURCES FROM THE NIGHT
Moon Dust falls nearby, with a chance of Moon Shards accompanying the lunar rain.
These six world-event types are distinct from Fate Events, which reveal a randomized outcome from a Majin's themed fate table. A boon can bless you, harm you, or lead into another encounter.
👑 BOSSES — CHALLENGE THE HAND THAT GRANTED YOUR WISH
«“You asked for their power. Now prove you can withstand it.”»
Majin boss fights are built around movement, telegraphed attacks, and mechanics that interrupt a simple damage race.
EVERY MAJIN:
- Moves through teleportation rather than walking.
- Casts attacks with distinct animations and warning effects.
- Progresses through three phases, based on remaining health.
- Raises an Aegis Shield sustained by destructible pylons.
- Introduces interactive trials as the fight advances.
- Gains additional challenge from the summoner's previous victories.
- Receives additional health scaling when other players are nearby at the start.
- Enrages after roughly five minutes, increasing its damage multiplier.
Leaving the dimension or moving more than 55 blocks from the Majin ends the summoner's fight as a loss. Do not confuse dodging an attack with abandoning the encounter.
ODRIKANDALARRAI — BREAK THE STELLAR VERDICT
Base Boss Health: 1,000 HP, before encounter scaling.
Signature Attacks: Starfall, Stellar Pulse, Meteor Barrage, Gravity Well, and Supernova.
Trial Rotation: Trial of Ascension and Trial of Light.
Odrikandalarrai turns the arena into a celestial threat map. Falling impacts punish hesitation, gravitational pulls disrupt positioning, and the final phase introduces a wide Supernova that demands a quick retreat from its warning zone.
BATTLE ADVICE: Keep moving during Meteor Barrage, watch where the Majin teleports, and leave the Supernova radius before the impact — without fleeing the fight entirely.
HELPHINAKADARAU — SURVIVE THE WILL OF PURGATORY
Base Boss Health: 1,300 HP, before encounter scaling.
Signature Attacks: Fire Cone, Fire Pillars, Flame Waves, Infernal Chains, and Soul Burn.
Trial Rotation: Trial of the Gauntlet and Trial of Light.
Helphinakadarau uses spreading fire, constricting movement effects, and punishing waves to deny comfortable ground. The later phases add chains and a soul-burning attack that turns hesitation into attrition.
BATTLE ADVICE: Sidestep the fire cone, read pillar warnings, and stand between Flame Wave rings rather than simply backing away in a straight line.
SELENAKADARAI — DANCE BENEATH THE ECLIPSE
Base Boss Health: 1,150 HP, before encounter scaling.
Signature Attacks: Moonbeam, Crescent Wave, Moon Rift, Lunar Tide, and Eclipse.
Trial Rotation: Trial of Ascension and Trial of the Gauntlet.
Selenakadarai combines lunar strikes with slowing effects, inward pulls, and lines of explosions. Its Eclipse darkens the encounter before a broad area strike punishes anyone who remains too close.
BATTLE ADVICE: Sidestep Moon Rift's line, resist the temptation to stand still while attacking, and move beyond Eclipse's warning radius in time.
SHARED THREATS
All three bosses can also use Blink Strike, rotating lasers, Gravity Flip, and summoned allies.
Jump the low laser beams. Crouch beneath the high ones. Expect a teleport behind you to be the beginning of an attack, not merely a change of position.
🏛️ AEGIS & TRIALS — POWER IS NOT ENOUGH
AEGIS SHIELD — BREAK ITS FOUNDATIONS
The Majin raises a barrier fed by three to five pylons, depending on the phase. The pylons also create hazards while you work to destroy them.
Destroy every pylon before the shield overloads. Breaking it staggers the Majin and opens a damage window with 75% additional damage.
Fail to break it in time, and the barrier detonates while the Majin recovers part of its health.
TRIAL OF ASCENSION — CLIMB BEFORE THE PATH CRUMBLES
Cross rising platforms and reach the golden destination. Some platforms collapse after you touch them. Falls return you to a checkpoint but cost time, and hostile strikes keep the route dangerous.
TRIAL OF LIGHT — CHASE THE DRIFTING STARS
Collect every moving light before the timer ends while avoiding targeted strikes. Nearby players can contribute to collecting the lights.
TRIAL OF THE GAUNTLET — STAND WHERE THE LIGHT SURVIVES
Survive five increasingly urgent rounds by reaching the illuminated safe zones before the arena detonates. Too many unsafe hits cause the trial to fail.
- SUCCESS: The Majin is staggered, creating an opening to attack.
- FAILURE: The Majin heals and punishes nearby players.
«“Strength opens the fight. Awareness wins it.”»
🏆 VICTORY — CLAIM WHAT FATE WITHHELD
Defeating a Majin rewards the summoner and nearby eligible players with:
- 1 matching Core.
- 3–5 matching Shards.
- 48–96 matching resources.
- +5 Luck.
- A chance of a matching Charm.
- 35% currency-cost discounts during the next five summons of that Majin.
The summoner also has a 35% chance to receive the matching summoning bottle back.
Victory increases your recorded wins against that Majin. Rematches can become tougher, so the prize is not permission to stop preparing.
🎬 VISUAL IDENTITY — STARS, FLAMES & THE VOID
The resource pack gives each power its own language:
- Stellar Combat: Golden verdicts, spectral slashes, fortune effects, and casino-inspired sounds.
- Infernal Combat: Ember trails, fire columns, heavy impacts, and roaring flames.
- Lunar Combat: Crescent attacks, magic circles, gravity effects, dark moons, and cosmic sounds.
Summonings unfold through animated bottles and portals. Mode changes pulse around the wielder. Charged guards surround the player with themed barriers. Ultimates use staged movement and camera sequences rather than a single instant attack.
The supplied resource pack includes 114 particle definitions and 30 audio files, alongside models, textures, and animation assets.
⚙️ INSTALLATION & IMPORTANT NOTES
- Import both the Behavior Pack and the Resource Pack, then activate them in your world.
- This is a Minecraft Bedrock add-on, not a Java mod.
- Both manifests declare a minimum engine version of 1.21.0.
- The Behavior Pack declares Script API dependencies on @minecraft/server 1.13.0 and @minecraft/server-ui 1.2.0.
- Use the Sneak action for alternate controls — Shift is only the default keyboard binding.
- Keep matching materials available: many powers consume dust or essence rather than a separate mana bar.
- Prepare open space for boss encounters, trials, teleportation, and cinematic attacks.
- Back up a valuable world before adding new packs.
«The declared minimum version is pack metadata, not a guarantee of compatibility with every later release or platform. In-game compatibility and experimental-feature requirements should be confirmed on the version you intend to use.»
🌟 A FINAL WORD — DESTINY IS WAITING
FATE: zero is a journey from gathering fragments to confronting the beings that gave those fragments meaning.
You may begin by chasing a little more Luck. By saving a shard instead of consuming it. By asking for one harmless boon beneath a sky full of stars.
Then the bottle opens.
The stars answer. Purgatory remembers your name. The moon offers its quiet bargain.
A blade becomes a game of life and death. An axe becomes a furnace you must learn to control. A scythe turns gravity into a weapon and stolen life into another chance.
And after the wishes, the offerings, and the trials, the Majin looks at you differently.
No longer only a mortal with a request.
A challenger.
THREE POWERS ARE WAITING. THE NEXT CHOICE IS YOURS.
“Will you follow fate — or make it answer to you?”
FATE: Zero TLS rpg Team

Owner