Workers & Warriors
- By
Hire villagers as warriors, miners, builders and farmers — with names, levels, wages, food and beds.
This is a new mod!
If you find any bugs or issues, please let me know in the comments and I’ll fix them as soon as possible.
## Hire a Villager
Right-click a villager and pay emeralds to hire him (every villager has his own price). Then choose his **profession** and give him a **unique name**. He needs a **bed** to sleep in at night and a **chest** for his wage, food and water — workers get hungry and thirsty, and want to be paid every day.
Workers gain **XP** from their work and can be **upgraded** (more health, higher wage).
## Professions ##
--------------------------------------------------------------------
### ⚔ Warrior
- Sword, bow or **mounted** on your tamed horse.
- Follow you, stand guard, **patrol** routes, or form a **defense ring** around you.
- Organize warriors into **groups** and command them together.
### ⛏ Miner
- Mark an area and he digs it out, bringing everything to his chest.
- **MINE – find ore:** pick an ore (iron, diamond, gold…). He goes to the mine you selected, digs down to the right height and tunnels until he finds it, then asks you in chat whether to keep searching.
### 🧱 Builder
- Mark an area, pick a block, and he builds it from the materials in his chest.
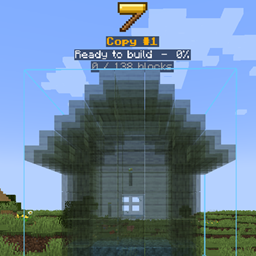
- Works with **Builder Holograms**: he can build whole copied structures for you.
### 🌾 Farmer
- Select his **land** (up to 10×10) and choose **seeds** for each plot — wheat, carrots, potatoes, beetroot, melons, pumpkins, nether wart on soul sand, and **seeds from other mods**.
- He tills, plants, harvests and replants, **digs water holes** in the smartest spots to keep the land wet, uses **bone meal** across the whole field, and brings the harvest to his chest at the end of the day.
- Needs a **hoe**, a **bucket** and a **well** (any water source).
## Easy to Manage
Modern menus for every worker, **Show** to see their areas in the world, clickable coordinates and worker cards in chat, scrollable job queues, and helpers that can join a task.
**Requires:** Minecraft 1.20.1, Forge 47+. Works in singleplayer and on servers (install on both).
## Extra Information ##
## Extra Information ##
## 🏘 Getting Started
### 1. Find a worker
Workers live in **villages** — every village has a few of them waiting to be hired.
### 2. Hire him
**Right-click** a worker to see his **hiring fee** and his **daily wage** (every worker has his own price).
### 3. Choose his profession and name
After hiring, choose his **profession** — each profession costs a different amount of emeralds.
Then give him a **unique name**.
### 4. Open his menu
**Right-click** your worker at any time to open his menu. Everything you need to know about him is there: health, hunger, thirst, wage, level, his job and more.
---
## 🏠 Taking Care of Your Worker
Give your worker a **bed** and a **chest** (use *Select bed* and *Select chest* in his menu), and keep him somewhere safe — like a house.
Put these in his chest:
- 🍖 **Food**
- 💧 **Pure Water**
- 💎 **Emeralds** (his daily wage)
**Without these he can't work.** He takes what he needs from the chest by himself.
> ⚠ **Be careful:**
> - If you don't pay him for a day, he **quits** the next day.
> - If he starves or dies of thirst, he **quits**.
>
> He always warns you in chat before it happens.
### 💧 How to make Pure Water
Take a normal **water bottle** and cook it in a **furnace** or on a **campfire**.
### 🎒 Tools & Food
Every worker has a **Tools & Food** menu: the tools he needs for his job, his food and water, and a small **inventory** for everything he collects (he unloads it into his chest).
---
## 🛠 Professions
All jobs are given from the worker's **Control Panel**.
### 🧱 Builder
| Button | What it does |
|---|---|
| **Mark area** | Gives you a **Marker** — click two corners to mark what to build. |
| **Use held block** | The block in your hand becomes the block he builds with. |
| **Add to queue** | Adds the job to his **queue**. You can give him several jobs and he does them in order. |
| **Add helper** | Gives you a Marker — click another **Builder** to make him help with this job. They work together and finish faster. |
| **Release helpers** | Frees the helpers from the job. |
| **Start building** | Starts the work. |
| **Clear queue** | Deletes all the jobs in the queue. |
Signs next to worker names:
- **@** — this worker is a **helper**.
- **^** — this worker **leads** the job.
### ⛏ Miner
The miner can dig out an area you mark, **or go find ores for you** — diamonds, iron, gold and more.
| Button | What it does |
|---|---|
| **Select mine** | Choose where he digs his mine when he searches for ore. Best in an open area — **not inside your house!** |
| **MINE – find ore** | Choose the ore you want. When he finds it he tells you in chat, and you choose: **keep searching** or **come back**. |
| **Mark area** | Mark an area to dig out, add it to the **queue**, and press **Start** — he does the rest. |
### 🌾 Farmer
| Button | What it does |
|---|---|
| **Select land** | Choose his land — he turns it into **farmland**. |
| **Select well** | Mark an **infinite water source** — he fills his bucket there. |
| **SEEDS** | Choose a seed, get a Marker, and mark **where on the farmland** to plant it. |
### ⚔ Warrior
There are **4 warrior types**: **Sword**, **Bow**, **Mounted Sword** and **Mounted Bow**.
| Button | What it does |
|---|---|
| **Equipment** | Give him **armor** and the **weapon** that fits his type. |
> 🏹 **Bow warriors** have **3 arrow slots** in their Equipment. Give them arrows, or put arrows in their chest and they'll take them by themselves.
**Mounted warriors** get two extra buttons:
| Button | What it does |
|---|---|
| **Select horse** | **Tame** a horse and put a **saddle** on it, then click it with the Marker. The horse now belongs to this warrior: it follows him everywhere and fights by his side when he is **dismounted** (*Dismount* command). |
| **Select park** | Mark where the warrior should **park** his horse. |
## ⌨ The Command Menu (R)
Press **R** anywhere to open the **Command Menu** — command your whole army with one click.
*(You can change the key in Options → Controls → Workers Mod.)*
### 🎯 Who gets the command?
Choose who your command is sent to:
| Option | Who |
|---|---|
| **[Name]** | Only the worker you're looking at |
| **ALL** | All your workers and warriors nearby |
| **WORKERS** | Only your workers |
| **WARRIORS** | Only your warriors |
| **GROUP ▾** | A group of warriors you created |
### 🧭 Move
| Command | What it does |
|---|---|
| **Follow** | They follow you everywhere. |
| **Come to me** | They walk to you. |
| **Stand at...** | You get a ball — **throw it**, and they go stand where it lands. |
| **Stop** | They stop and stay where they are. |
| **Free** | They go back to their normal life (work, eat, sleep). |
### 🛠 Work
| Command | What it does |
|---|---|
| **Go to chest** | They go to their chest (to eat, drink, get paid and unload). |
| **Get back to work** | Everyone returns to his job — warriors go back to guarding or patrolling. |
### ⚔ Warriors only
| Command | What it does |
|---|---|
| **Attack** | Attacks every hostile mob he sees. |
| **Defense** | Forms a **defense ring** around you and protects you. |
| **Passive** | Doesn't start fights. |
| **Mount / Demount** | Mounted warriors get on or off their horse. |
| **Park horse** | Parks the horse at its parking spot. |
| **Attack target** | Look at a mob — all chosen warriors attack it. |
| **Clear target** | Cancels the target. |
### 📋 More menus (top of the screen)
- **Warriors / Workers** — a list of all your warriors or workers. For each one:
- **Details** — see his inventory, food, water and wage.
- **Orders** — give him a command.
- **Skills** — see his level and upgrade him.
- **TP** — teleport to him.
- **Summon** — bring him to you.
- **Groups** — create **groups of warriors** and command each group separately.
- **+ New group**, then **Add** — click warriors with the Marker to add or remove them.
- **Name**, **Show** (mark them in the world), **Summon** (bring the whole group to you).
- **Patrols** — create **patrol routes** for your warriors.
- **+ Add route** — click the **two ends** of the route with the Marker.
- **Assign** — click a warrior with the Marker to put him on the route.
- **Start / Stop** — start or stop all patrols.
- **Show** the route in the world, or **TP** to its start.
Workers & Warriors Team