


Stuttis ShapeCommands
A hytale command plugin providing a command to create procedural shapes in creative worlds.
Usage
The main command is /generateshape, which takes a shape type and a number of parameters to generate the shape (as an in memory prefab to be used with the "Paste Tool". While it is possible to use the command with parameters from the console, the easiest way to use it is by utilizing the GUI that comes along with ShapeCommands:
/generateshape --ui
This will open a dialog that provides a more convenient way to enter all the needed parameters:
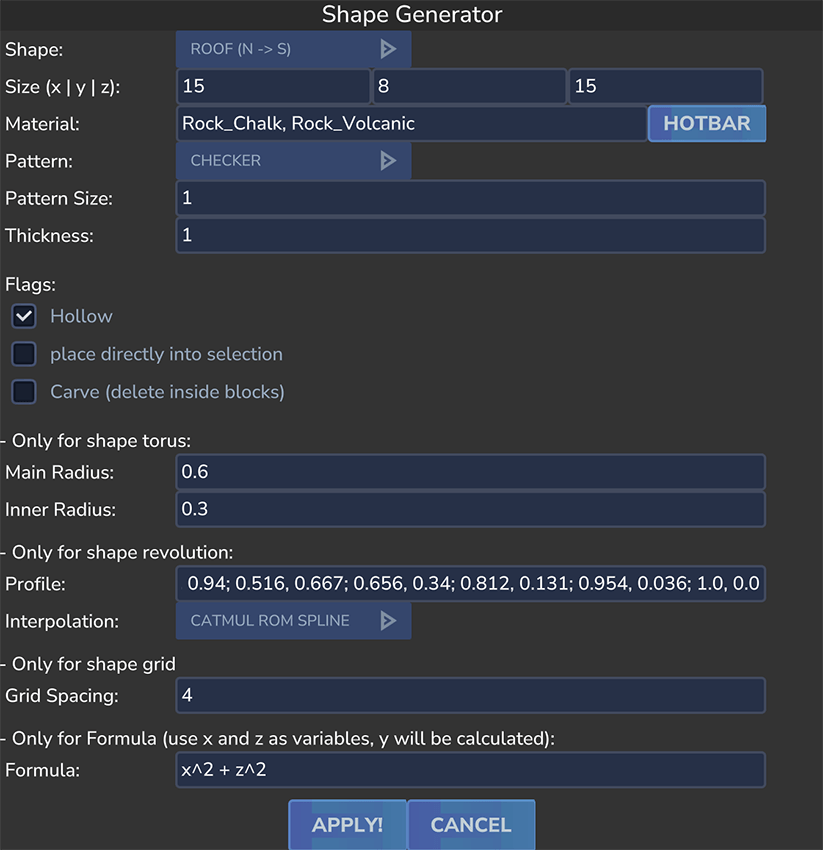
Way of working
The command takes the provided information and generates a prefab in memory for the player to put down using the "Paste Tool". It takes the size (in blocks) and generates the specified shape so that it fills the provided cuboid selection. This means instead of telling the command to "create a sphere at this position using that radius" it simply takes the provided size and fills it with the specified shape. This also means that, if the selection has different sizes on each axis, the shape will be stretched accordingly. For example, if you specify a sphere and provide a selection that is 5 blocks wide, 10 blocks high and 5 blocks deep, the generated shape will be an ellipsoid that is stretched in the vertical direction. This is true for all possible shapes.
The default way of working is to use the command to create an in-memory shape ready to be pasted down using the "Paste Tool". However, there is also the possibility to directly place the shape into the world, provided that the player has marked a selection with the "Selection Tool" and checked the "place directly into selection" checkbox.
Some shapes (like cylinder, cone and pyramid) are always generated facing upwards (i.e. along the vertical axis). This means that if you want to create a horizontal cylinder, you would first generate an upright cylinder and then rotate it using Hytales build in controls of the "Paste Tool".
Selection handling
The /generateshape command can be used with or without a block selection. If a selection has been made with the "Selection Tool", the command will use the specified size of the selection (and put these values into the "size" text fields). But that does not mean that the shape will be immediately generated at the location of the selection. For this, the "place directly into selection" checkbox has to be enabled (or the argument "--inplace" has to be provided in the command).
Parameters
Shape Type (--shape=[type])
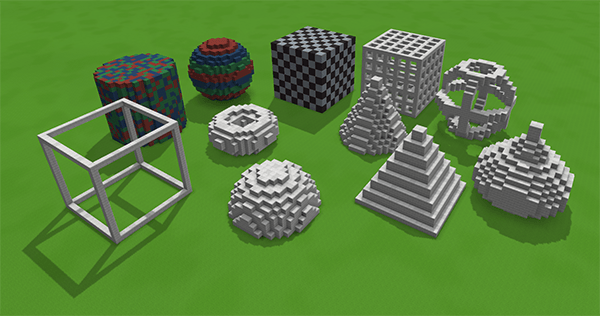
The shape type parameter specifies the type of shape to generate. The following shape types are available:
sphere
Fills the provides selection with a ball
dome
Fills the provided selection with a dome (i.e. a half sphere). Note: to make a perfect half-sphere, the selection (or size) should be half as high as it is wide.
cylinder
A Cylinder (upright, along the vertical axis) that fills the provided selection.
cone
A cone (upright, along the vertical axis) that fills the provided selection. Note: to make a perfect cone, the selection (or size) should be half as high as it is wide.
pyramid
A pyramid (upright, along the vertical axis) that fills the provided selection. Note: to make a perfect pyramid, the selection (or size) should be half as high as it is wide.
torus
A torus (i.e. a donut shape)
box
A box
frame
A box that only consists of the edges. Useful to mark out rectangular sections.
grid box
A box with a "cage like" appearance. uses "gridstep" to determine the distance (in blocks) between the grid lines.
grid sphere
A sphere with a "cage like" appearance. uses "gridstep" to determine the distance (in blocks) between the grid lines.
revolution
Rotational symmetric shapes that are created by revolving a profile around the vertical axis. The profile is defined using the "profile" parameter (or the argument "--profile=[profile]") and specifies the shape of the profile that will be revolved around the vertical axis to create the final shape.
roof
Creates a simple roof like shape, available for north to south or west to east roof orientations. Note that this does not work magically with Hytales roof blocks. Block orientation is still out of scope for ShapeCommands
formula
A shape defined by a formula. The formula is defined using the "formula" parameter (or the argument "--formula=[formula]") and specifies a mathematical formula that defines the shape. The formula should be in the format "y = f(x,z)", where f is a function of x, y and z. For example, the formula "x^2+z^2" specifies a paraboloid.
Note that X and Z are evaluated in the range of -1 to 1, and also resulting values for Y are in the range of -1 to 1 as well. Like with all other shapes, the resulting surface is then stretched to fit inside the specified size or the selection.
Evaluation of the formula is done using expression evaluation library "exp4j". This means that the formula can contain any function that is supported by this library. For example, you could use "y = sin(sqrt(x^2+z^2))" to create a wavy shape.
https://www.objecthunter.net/exp4j/
Size (--x=[x] --y=[y] --z=[z])
Specifies the desired size of the shape to be generated. If a selection is provided when the gui is opened, the size will be automatically filled with the size of the selection, but can still be adjusted manually.
Material (--material=[material_id_1,material_id_2,…])
This is a list of comma separated materials. The generated shape will be created with these, depending on the selected pattern and the number of materials. Note that the "itemId()" of the desired block has to be specified here, so "Rock_Marble_Bricks" instead of just "Marble Bricks". Also note that the materials have to be placeable blocks. If a non placeable block is provided, it will be ignored and not used for the generation of the shape.
As it might be tedios to look up all the item Ids and type them out each time a new shape should be generated, there is also a "Hotbar" Button in the UI that allows to quickly fill the materials list with the blocks currently in the player's hotbar, ignoring any non placeable items. Note that this will replace the current content of the materials list.
Pattern (--pattern=[pattern])
This parameter specifies the pattern to be used for the materials. The following patterns are available:
- "random"
- "layered_x"
- "layered_y"
- "layered_z"
- "checker"
- "checker_2d"
- "plain"
Random will simply choose one of the provided materials randomly for each block.
Layered will create layers of the provided materials in the specified direction (x, y or z).
Checker will create a checkerboard pattern with the provided materials. Note that this works with more than 3 materials, iterating through the provided materials in the order they are given.
Checker_2D will create a 2D checkerboard pattern, only taking the X and Z coordinates into account, which results in vertical stripes on walls.
Plain will simply use the first provided material for the entire shape (effectively "no pattern").
Pattern Size (--patternSize=[pattern size])
This parameter specifies the size of the pattern. For example, if you choose a layered pattern and specify a pattern size of 3, the generated shape will have layers that are 3 blocks thick. Accordingly the checker pattern will have squares 3 blocks wide and deep.
Has no effect for "plain" and "random"
Thickness (--thickness=[thickness])
Shapes can be hollow if the according flag is set. Then "thickness" specifies how thick the walls of the hollow shape should be (in blocks). For most shapes that works more or less reliably.
For the shapes "frame" and "grid box" the thickness parameter specifies how thick the edges of the frames should be.
Hollow (--hollow)
Flag to controll whether the shape should be hollow or solid. Is ignored for some shapes (like "formula").
Carve (--carve)
For hollow shapes only: If set, then the "inside" of the shape will be carved out of the world upon placing the shape down with the "Paste Tool".
Place Directly Into Selection (--inPlace)
If (and only if) a selection has been made previously with the selection tool, this flag controlls whether the generated shape should be placed directly into the world at the location of the selection.
Special parameters
While "shape", "x", "y", "z", "material", and "thickness" are global settings there are also some that only work with specific shapes. For example, the "profile" parameter only works with the "revolution" shape type and specifies the profile to be revolved around the vertical axis to create the shape. Likewise there are "Main Radius" and "Inner Radius" that only apply to the shape type "torus".
Profile and Interpolation
These settings only apply to the "revolution" shape type.
Profile
The "profile" parameter specifies the profile to be revolved around the vertical axis to create the shape. This setting may take a bit to wrap the head around, but it is actually quite simple. The profile is defined as a list of points in the format "y1,r1; y2,r2; …; yn,rn". These points define the shape of the profile that will be revolved around the vertical axis to create the final shape.
Note that these points are defined in the unit square, which means that the y values should be between 0 and 1, where 0 corresponds to the bottom of the shape and 1 corresponds to the top of the shape. The r values should also be between 0 and 1, where 0 corresponds to a radius of 0 (i.e. a point) and 1 corresponds to the maximum radius (which is determined by the size of the selection). For example, if you specify a point "0.5,0.5", this means that at half the height of the shape (y=0.5) the radius should be half of the maximum radius (r=0.5).
It is also possibe to provide the name of a number of build in profies instead of a custom profile. These built in profiles are:
- cooling_tower
- onion_tower
- dome
- vase
Profile examples:
This is the build in profile "cooling_tower":
"0.0, 1.0; 0.6, 0.7; 1.0, 0.8"
This would read like "Start at the bottom with the maximum radius of 1.0, then at 60% of the height the radius should be 0.7, and at the top (100% of the height) the radius should be 0.8". This results in a shape that is wide at the bottom, then narrows in the middle and widens again at the top, which is a common shape for cooling towers.
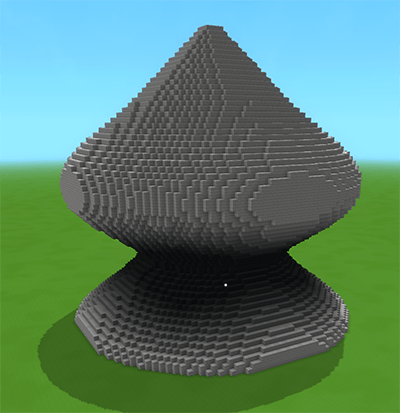
Another example:
"0.0, 1.0; 0.25, 0.5; 0.5, 1.0; 0.75, 0.5; 1.0, 0.0"
Leads to this shape (using "Catmull Rom Spline" interpolation):
Interpolation
This specifies how the points of the profile will be connected. "linear" means no interpolation will be applied and the points will be connected with straight lines. "Catmull Rom Spline" means that a "Catmull Rom" spline interpolation will be applied to the points, which results in a smoother shape.
Torus parameters
The two parameters "main radius" and "inner radius" only apply to the shape type "torus". The "main radius" specifies the distance from the center of the torus to the center of the tube, while the "inner radius" specifies the radius of the tube itself.
Again here a main Radius of 1.0 would mean the center of the torus tube would lie on the edge of the selection (thus cutting away a large part of the shape). A rule of thumb is to make sure that the sum of main and inner radius is not greater than 1. It is possible to do so (the individual radii are clamped to a maximum of 5.0), but the resulting shape will be cut off by the selection and thus look a bit weird - but that might be what you want…
Grid Spacing
Certain shape types gridbox and gridsphere have a "grid spacing" parameter that specifies the spacing between the grid lines. This parameter is ignored for other shape types. A grid spacing of 1 means that there will be a grid line every block, a grid spacing of 2 means that there will be a grid line every 2 blocks, and so on.
Command reference
/generateshape --shape=[type] --x=[x] -y=[y] -z=[z] --material=[material_id_1,material_id_2,…] --pattern=[pattern] --patternSize=[pattern size] --thickness=[thickness] --profile=[profile] --interpolation=[interpolation] --torusMainRadius=[main radius] --torusInnerRadius=[inner radius] --gridstep=[grid spacing] --formula=[formula] --hollow --carve --inPlace
Mod Packs
Feel free to include ShapeCommands in your mod pack.
Future Plans / Ideas
- More shapes (e.g. fraktals, height fields, etc.)
- More dynamic UI (dialog should show only the parameters that are relevant for the selected shape type)
- Ideas? Suggestions? Feel free to comment.
Changelog
0.1.3
- Updated to the current server version (finally…)
- Server Version: 2026.03.26-89796e57b
- Added mod icon
0.1.2
Server Version: 2026.02.19-1a311a592
Bugfixes and improvements
- Corrected roof orientation (NS and WE orientation were switched)
New Features
- Added shape type "formula" that allows to create shapes based on mathematical formulas. The formula should be in the format "y = f(x,z)", where f is a function of x and z. For example, the formula "x^2+z^2" specifies a paraboloid.
- Added "Hotbar" Button besides the materials list. This button allows to quickly fill the materials list with the blocks currently in the player's hotbar, ignoring any non placeable items.
0.1.1
Server Version: 2026.02.19-1a311a592
Bugfixes and improvements
- Changed text fields for "Shape", "Interpolation" and the new "Pattern" functionality into dropdown boxes
- Added proper validation of all parameters. Error messages are put into the chat
- Fixed torus not respecting the provided radii and always going with the defaults
- Allowed torus to have bigger radii. This means if the sum of the main and inner radius exceeds 1.0, the shape will still be generated, but it will be cut off by the selection. Might be useful.
New Features
- Added possibility to enter multiple materials as a comma separated list.
- Added a "Pattern" selection to the UI that allows to specify a pattern for the materials. Currently implemented:
- "Random" (randomly uses one of the provided materials for each block)
- "Layered" (creates repeating layers of the provided materials, available for all 3 Axis)
- "Checker" (creates a checkerboard pattern with the provided materials. Works also with more than 2 materials)
- "Checker 2D" (creates a 2D checkerboard, only taking the X and Z coordinates into account, which results in vertical stripes on walls
- "Plain" (the default pattern, simply uses the first provided material for the entire shape)
- Added new Shape "Roof". Creates a simple roof like shape, available for north to south or west to east roof orientations. Note that this does not work magically with Hytales roof blocks. Block orientation is still out of scope for ShapeCommands
0.1.0
Initial release