Effortless Building: Sophisticated (Enhanced Fork)
- By
Advanced building QoL mod with mirror/array/shape modes, expanded reach, per-axis placement limits, backpack-based building upgrades, compact HUD counts, and clear missing-item feedback for survival building.
dcimage.png
10-building-upgrade-tab.png
Description
Sophisticated Building

Sophisticated Building is a stability-focused, feature-rich fork of Effortless Building, tailored for large-scale survival builds. Pick a build mode, click two or three points, check the live preview, and a whole line, wall, floor, cube, circle, sphere, pyramid, cone or natural-looking hill is placed at once. Mirror, radial-mirror and array your builds, swap blocks with replace modes, and undo anything with Ctrl+Z.
It runs on every Minecraft version from 1.16.3 to 26.2, on Fabric, NeoForge and Forge wherever the loader exists for that version, and it is fair in Survival: every block costs its item, mass breaking uses your tools, durability and hunger, and undo refunds exactly what it should. With the optional Sophisticated Backpacks integration, a Building Upgrade feeds your builds straight from your backpacks.
Contents
- Features at a glance
- Getting started (radial menu, placing, breaking, cancelling, previews)
- Power level and reach
- Build modes (every mode and option)
- Modifiers (Mirror, Array, Radial Mirror)
- Replace modes and protection
- Survival rules (items, mass breaking, undo/redo)
- Items and recipes
- Sophisticated Backpacks integration
- Player Settings and HUD
- Configuration
- Controls and commands
- Supported versions and compatibility
- FAQ and troubleshooting
- Dependencies
- Attribution
1. Features at a glance
- 15 build modes: Disable, Single, Line, Wall, Floor, Cube, Diagonal Line, Diagonal Wall, Slope Floor, Circle, Cylinder, Sphere, Pyramid, Cone and Terrain Mound, each with its own options (filled, hollow, skeleton, line thickness 1/3/5, corner or middle start, short or long raised edge, five terrain shapes with optional natural variation).
- 3 modifiers that stack: Mirror (X, Y and Z planes), Radial Mirror (3 to 1000 slices) and Array (up to 100 copies). Add as many as you like; they apply in list order.
- Replace modes: Only Air, Blocks And Air, Only Blocks and Filter By Offhand, plus Quick Replace and tile entity protection.
- Live preview: ghost blocks, outline, block count and size, a list of the blocks needed, and counts of what you have and what is missing. Blocks you cannot pay for or cannot break are marked and skipped, never faked.
- Fair Survival: exact item costs (also for double slabs, candles and other multi-item blocks), items with data (named blocks, filled shulker boxes) keep their data, failed placements are not charged, mass breaking with the right tool, durability, drops, hunger and a short mining delay, tools are never broken, optional survival replace.
- Undo and redo (50 steps by default) that follow the same survival rules.
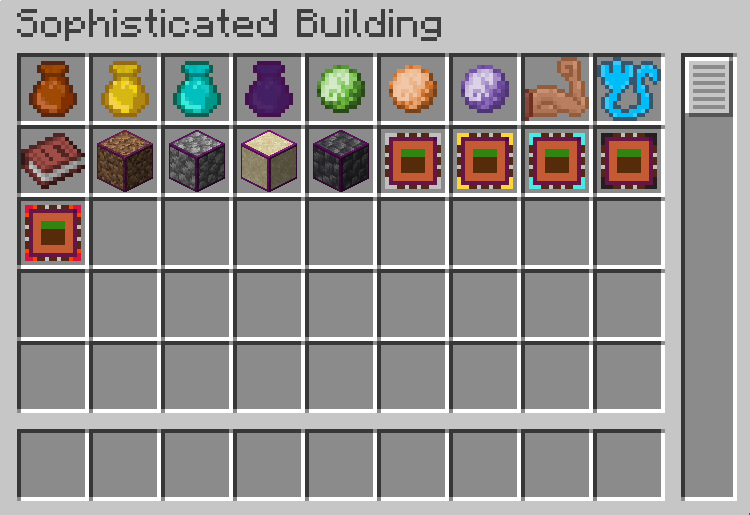
- Randomizer Bags (5, 9, 27 and 54 slots) that place a random block from your templates; the Omega bag has a weight per slot.
- Power levels: Reach Upgrades 1 to 3 raise your reach and your build limits in Survival.
- Sophisticated Backpacks integration: Building Upgrade tiers 1 to 4 and Omega let a build take blocks from your backpacks (worn ones too), and mass breaking uses tools from Tool Swapper backpacks.
- Player Settings screen for all preview and performance settings, no config file editing needed.
- Works without Sophisticated Backpacks: everything except the backpack features works on its own; the Building Upgrade items then stay as inert placeholders without recipes.
2. Getting started
Quick start in 5 steps
- Hold a block (for example a stack of stone) in your main hand.
- Hold Left Alt to open the radial menu, point at Line and release the key (or click).
- Right-click the block where the line should start. Move the crosshair: a white outline and ghost blocks show the line.
- Right-click again to place the whole line. Left-click instead cancels it.
- Made a mistake? Ctrl+Z undoes the last build, Ctrl+Y redoes it.
To get back to plain vanilla placing and mining, choose Disable in the radial menu. The game always starts in Disable mode.
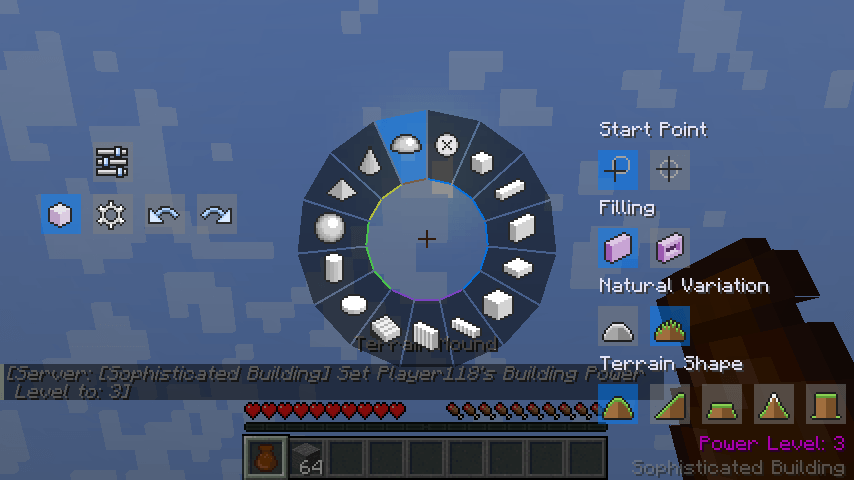
The radial menu
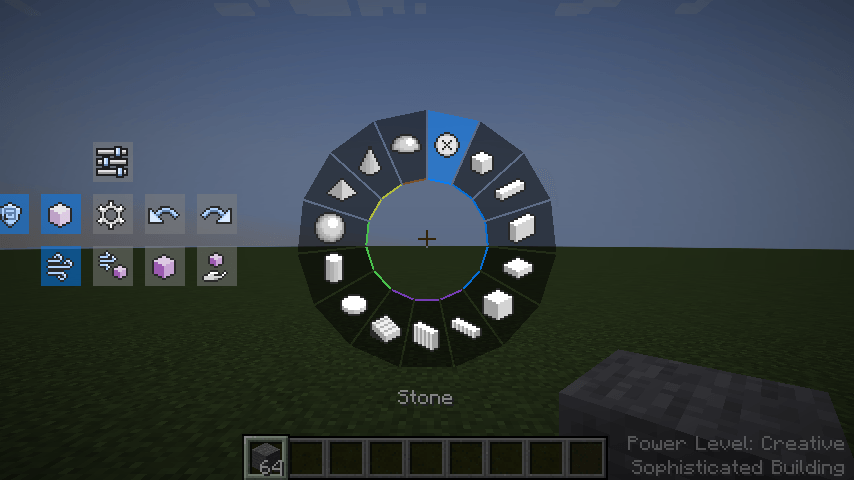
Hold Left Alt (key Radial Menu) to open it; it stays open while you hold the key and does not pause the game. Point at an entry and click it or release the key. A soft click confirms the choice, and the new mode's name appears above the hotbar.
- The ring: the 15 build modes, grouped by colour (basic, diagonal, circular, roof, terrain). Pointing at a mode shows its name and, where it has one, a description.
- Left side, top: Open Player Settings.
- Left side, middle row: Redo, Undo, Open Modifier Settings, Mini Block Preview (on/off) and, when you may replace blocks, Protect Tile Entities (on/off).
- Left side, bottom row (only when you may replace blocks): Replace Only Air, Replace Blocks And Air, Replace Only Blocks, Filter By Offhand.
- Right side: the options of the current build mode, one labelled row per option; the active choice is highlighted.
- Bottom right: your Power Level (or Creative). Point at it to see your current limits and those of the next level.
You "may replace blocks" in Creative, and in Survival only when the server has enabled survival replace (off by default). Opening the menu does not cancel a build you have started; choosing a different mode does.
Placing
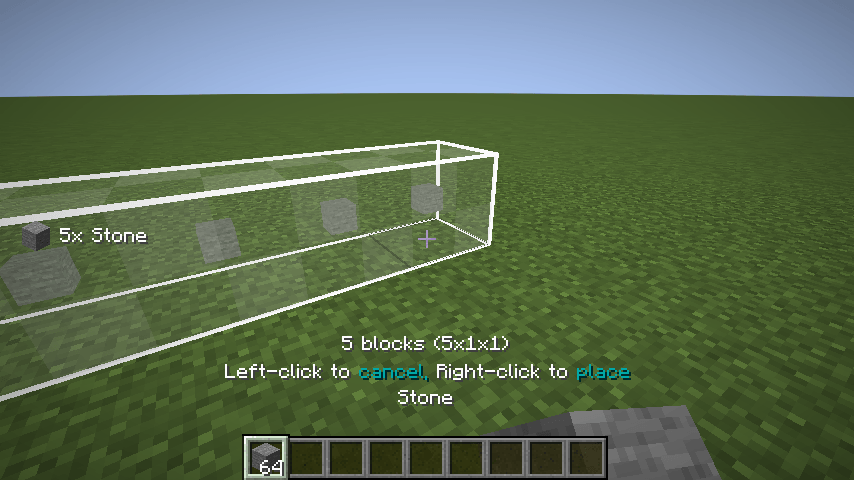
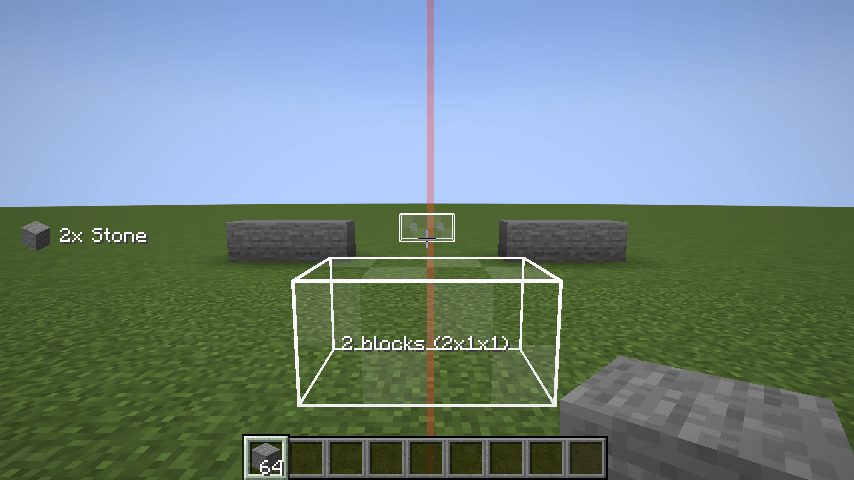
Hold a block or a Randomizer Bag in your main hand, pick a build mode and right-click the points. While you build you see:
- a white outline and semi-transparent ghost blocks,
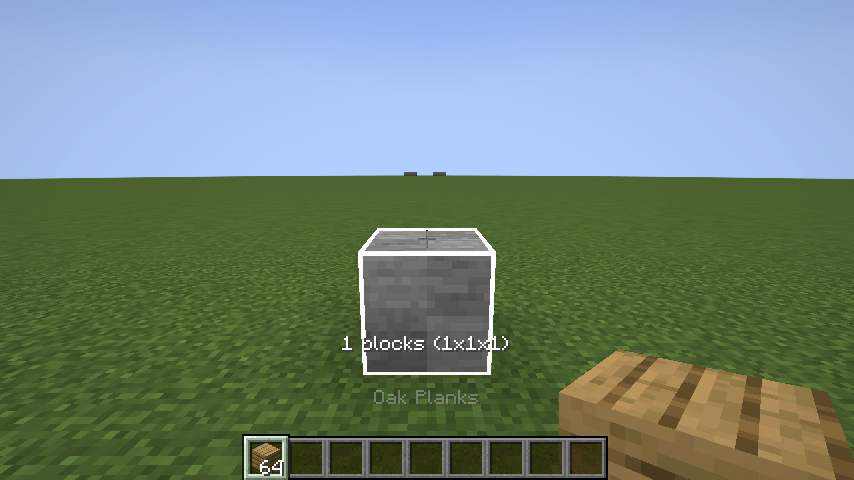
- the block count and size above the hotbar, for example
5 blocks (5x1x1)(width x depth x height), - the hint Left-click to cancel, Right-click to place,
- a list of the blocks needed at the left edge of the screen (for example
5x Stone).
The first click must hit a block; clicking into the air starts nothing. Holding the right mouse button repeats the click every 4 ticks (every tick with the Fast build speed).
Breaking
With a build mode active, left-clicks break in the same shape: set the points with left-clicks, the last one breaks everything in the outline, right-click cancels. In Creative this is instant; in Survival it follows the survival rules in section 7. While a build mode is active, the mod handles mining instead of vanilla (in Creative, and in Survival while survival breaking is enabled). Switch to Disable for normal mining.
Cancelling
A build or break in progress is cancelled when you left-click while placing (or right-click while breaking), right-click an interactive block such as a chest or door without sneaking, open any screen other than the radial menu, or choose another build mode. A short sound confirms it.
Previews
- Blocks that cannot be placed (missing items, a block in the way in Survival) or broken (no suitable tool, unbreakable, protected) get a grey checkered outline and are skipped.
- The mini block preview draws a small block inside each ghost block so you can see its rotation (radial menu or Player Settings).
- For performance, ghost blocks are drawn only up to Max Block Previews (4096) and within Preview Distance (64 blocks); the outline is always drawn.
3. Power level and reach
In Survival your building power depends on your power level (0 to 3); Creative has its own, higher limits. Each level raises four limits (defaults, configurable in the common config):
| Limit | Level 0 | Level 1 | Level 2 | Level 3 | Creative |
|---|---|---|---|---|---|
| Placement reach (blocks) | 0 (vanilla reach) | 8 | 16 | 32 | 200 |
| Max blocks per axis | 8 | 16 | 24 | 32 | 1000 |
| Max blocks placed at once | 128 | 256 | 512 | 2048 | 10000 |
| Max (radial) mirror radius | 16 | 32 | 48 | 64 | 200 |
- Placement reach: how far away the first click can be. At level 0 you build within vanilla reach. The second and third click can be 6 blocks further than your placement reach.
- Max blocks per axis: the longest side a shape can have.
- Max blocks placed at once: the size of one build (copies from modifiers included); a larger preview is cut off.
- Max mirror radius: how far Mirror and Radial Mirror reach.
You raise your power level by using Reach Upgrade 1, 2 and 3 in that order (section 8); operators can set it with /powerlevel (section 12). The server additionally rejects any single build larger than Validation.maxBlocksPlacedAtOnce (10000 blocks) for everyone.
4. Build modes
How the clicks work
- One click: Disable and Single.
- Two clicks: Line, Wall, Floor, Circle. Click 1 sets the start, click 2 places.
- Three clicks: Cube, Diagonal Line, Diagonal Wall, Slope Floor, Cylinder, Sphere, Pyramid, Cone, Terrain Mound. Click 1 sets the start, click 2 a point at the same height (the base), click 3 the height (look up or down along the vertical line above the second point) and places.
Right-clicks place, left-clicks break the same shape. Options are shared between modes (for example Filling is one setting for all modes that have it) and go back to their defaults when you restart the game.
Options
| Option | Choices | Default | Modes |
|---|---|---|---|
| Build Speed | Normal, Fast | Normal | Single |
| Filling | Filled, Hollow | Filled | Wall, Floor, Diagonal Wall, Circle, Cylinder, Sphere, Pyramid, Cone, Terrain Mound |
| Filling (cube) | Filled, Hollow, Skeleton | Filled | Cube |
| Line Thickness | 1, 3 or 5 Blocks Thick | 1 | Line, Diagonal Line |
| Raised Edge | Short Edge, Long Edge | Short Edge | Slope Floor |
| Start Point | Corner, Middle | Corner | Circle, Cylinder, Sphere, Cone, Terrain Mound |
| Natural Variation | Smooth, Natural | Natural | Terrain Mound |
| Terrain Shape | Mound, Slope, Flat, Mountain, Wall | Mound | Terrain Mound |
Start Point: with Corner your first click is a corner of the shape's bounding box and the second click the opposite corner; with Middle the first click is the centre and the second sets the radius.
Basic modes
- Disable - "Disable mod and use vanilla placement rules." Your modifiers and Quick Replace still apply to blocks you place by hand.
- Single - "Like vanilla, but with increased reach and placement preview." One block per click at your placement reach. Build Speed: Normal repeats every 4 ticks while holding the button, Fast every tick.
- Line (2 clicks) - a straight line along X, Y or Z (the axis that best matches where you look). Line Thickness 1, 3 or 5 gives a square cross-section.
- Wall (2 clicks) - a vertical wall along X or Z. Filled or Hollow (outer frame only).
- Floor (2 clicks) - a horizontal rectangle at the height of click 1. Filled or Hollow (outline only).
- Cube (3 clicks) - floor corners, then height. Filled, Hollow (six faces, empty inside) or Skeleton (twelve edges).
Diagonal modes
- Diagonal Line (3 clicks) - a straight line in any direction, from click 1 to the point set by clicks 2 and 3. Line Thickness 1, 3 or 5.
- Diagonal Wall (3 clicks) - a diagonal line on the floor (clicks 1 and 2) raised to the height of click 3. Filled, or Hollow (bottom and top line plus both end columns). Always one block thick.
- Slope Floor (3 clicks) - a ramp: clicks 1 and 2 set the rectangle, click 3 the height of the raised side. Raised Edge: slope along the Short Edge or the Long Edge.
Circular modes
- Circle (2 clicks) - a flat circle or ellipse. Start Point; Filled disc or Hollow ring.
- Cylinder (3 clicks) - a circle extruded to a height. Start Point; filled or hollow tube.
- Sphere (3 clicks) - size on the floor, then height: spheres and ellipsoids. Start Point; Filled ball or Hollow shell.
Roof modes
- Pyramid (3 clicks) - a rectangular base shrinking layer by layer up (or down) to the height. Hollow keeps the base and top layers full and only the outline of the layers in between.
- Cone (3 clicks) - a round base narrowing to a point. Start Point; Filled or Hollow (outer surface only).
Terrain Mound
Terrain Mound (3 clicks) - "Build natural-looking terrain shapes." Click 1 sets the centre (or corner), click 2 the radius (at least 1), click 3 the maximum height (up to your max blocks per axis).
Filling: Filled fills from the base up to the surface, Hollow places only the surface layer.
Natural Variation: Natural (default) adds an uneven, natural surface, Smooth keeps the shape clean. It applies to shapes more than 2 blocks high. The variation is fixed per spot, so the preview does not flicker and you get exactly what you saw.
Terrain Shape:
- Mound - a rounded hill.
- Slope - a ramp, highest on the side nearest to you, running down in the direction you look.
- Flat - a plateau with stepped, irregular edges.
- Mountain - a sharp, terraced peak.
- Wall - a cliff that rises gently from your side and drops off steeply at the far side.
Slope and Wall turn to match the direction you look when you build.
5. Modifiers
Modifiers copy everything you place or break, in every build mode (Single and Disable included).
Modifier Settings screen
Open it with Numpad + (key Modifier Menu) or the radial menu button; press the key again, Escape or the « button to close it (your settings are saved on the server then, so they are back when you join).
- The three + buttons (top right) add an Array, a Mirror or a Radial Mirror.
- Each modifier panel has a checkbox (enable/disable), a trash can (remove) and up/down arrows (order).
- You can add as many as you like, several of the same kind too. They are applied from top to bottom, and each one copies everything produced above it: an array followed by a mirror mirrors the whole array.
- Number fields: mouse wheel over the field (Shift faster, Ctrl slower), arrow keys, or +/-.
Copies count towards max blocks placed at once, and in Survival every copy costs its item.
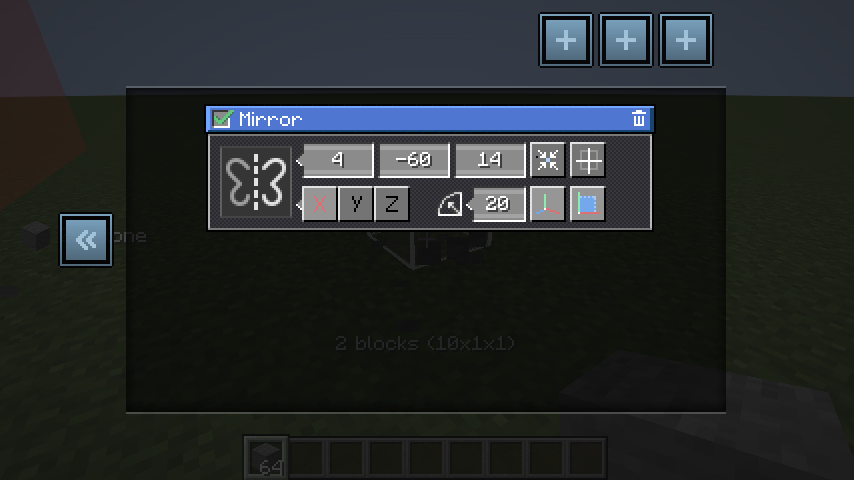
Mirror
| Setting | Default | Notes |
|---|---|---|
| Position X/Y/Z | Your position when you add it | Half-block steps; Set to player position button |
| Block corner / centre | Corner | "Set position to center of block, for uneven numbered builds" (or corner, for even ones) |
| Axes X, Y, Z | X on | Combine them: X+Z gives 4 copies, X+Y+Z gives 8 |
| Radius | 10 | Only blocks within this distance (a cube) are mirrored; 0 to your max mirror radius; set to the maximum when your power level changes |
| Show mirror lines / areas | On / On | Draws the axis lines and planes in the world |
Mirrored blocks are flipped too, so stairs and other directional blocks face the mirrored way.
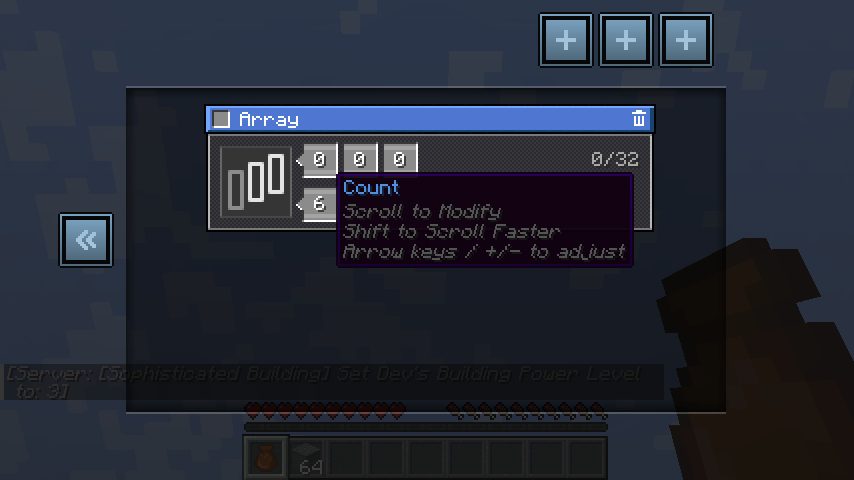
Array
| Setting | Default | Range |
|---|---|---|
| Offset X/Y/Z | 0, 0, 0 | Any whole number (an offset of 0, 0, 0 does nothing) |
| Count | 5 | 1 to 100 copies, added to the original |
The panel shows the array's length (largest offset x count) against your max blocks per axis, for example 0/32; it turns red when the array is longer. That is a warning only, the copies are still made (the max blocks placed at once limit still applies).
Radial Mirror
Copies blocks around a vertical axis, like slices of a cake - for round towers, fountains, rose windows.
| Setting | Default | Range / notes |
|---|---|---|
| Position X/Y/Z | Your position | Same controls as Mirror |
| Slices | 4 | 3 to 1000 |
| Alternate | Off | Every second slice is mirrored instead of only rotated, for symmetric patterns |
| Radius | 20 | Only blocks within this distance (a sphere); 0 to your max mirror radius |
| Show lines / areas | On / Off |
Copied blocks are rotated with their slice.
6. Replace modes and protection
Replace modes
| Mode | What it does |
|---|---|
| Replace Only Air (default) | Normal building: blocks go into air and replaceable blocks (tall grass, water, snow layers). |
| Replace Blocks And Air | Fills the whole shape and overwrites what is there. |
| Replace Only Blocks | Only overwrites existing blocks; air stays air. Great for re-skinning a wall or floor. |
| Filter By Offhand | Only blocks of the type in your offhand are replaced; with nothing in the offhand, only air is filled. It also filters breaking: a mass break only removes blocks of the offhand type. |
The replace modes are available in Creative and, in Survival, only when the server enables survival replace.
Quick Replace
Every replace mode except Replace Only Air is Quick Replace: your click targets the block you look at instead of the space in front of it. It also works in Disable mode, where each right-click replaces the block you look at, with a preview of that block.
Protect Tile Entities
On by default. Blocks that hold data (chests, furnaces, hoppers, barrels, signs, …) are never replaced by a build and are skipped by mass breaking. The toggle is shown next to the replace modes; when those are hidden (Survival without survival replace) the protection stays on, so mine such blocks in Disable mode.
Merges
When a build places one of these onto the same block, it merges one step for one item instead of being skipped: slab to double slab, one more candle, sea pickle, turtle egg, snow layer or pink petal (candles from Minecraft 1.17, pink petals from 1.20). Other blocks with states (crops, composters, respawn anchors) are never advanced by building over them.
7. Survival rules
Nothing is free in Survival, and the server checks everything. Players who may not build (for example in Adventure mode) cannot use the mod; a server can also disable it in Survival or limit it to a whitelist (section 11).
Which items are used
- Every block costs its item. Blocks you cannot pay for are marked and skipped; the rest is placed.
- Multi-item blocks cost all their items: a double slab costs two slabs, three candles three candles; a merge costs only the item it adds.
- Order: first your backpacks (with an enabled Building Upgrade, up to its tier), then the stack in your hand, then the rest of your inventory.
- Items with data keep it: a named block, a filled shulker box or a Supplementaries sack is placed from that exact stack with its name and contents (main hand first, then offhand, then inventory).
- Failed placements are not charged: if the server does not place a block (a protection mod cancels it on NeoForge or Forge, water plants in the Nether, the block is already there), you keep the item.
- With a Building Upgrade active and the same block in your backpack, the last block in your hand stays, so your hand never runs empty while the backpack still has more.
Mass breaking
On by default (SurvivalBreaking.enabled).
- Tool choice: main hand, rest of the hotbar, inventory, offhand, then the tools in a backpack with an enabled Tool Swapper or Advanced Tool Swapper. The first effective tool for each block is used (pickaxe, axe, shovel, hoe, shears). Blocks that need the correct tool for drops (stone, ores) only accept the correct tool.
- Blocks that break instantly (flowers, torches, grass) need no tool. A block without an effective tool that does not require one can be broken with the tool in your main hand; with no tool at all, such blocks are skipped (no bare-hand mass mining).
- Unbreakable blocks are always skipped. Tools never break: a tool with 1 use left is not used.
- Durability, drops, hunger: one use per block (Unbreaking, Fortune and Silk Touch work as in vanilla), drops go straight into your inventory, 0.005 exhaustion per block like vanilla mining.
- Protected blocks are skipped: spawn protection (operators excepted), world border, adventure-mode rules and, on NeoForge and Forge, protection mods that cancel the break event.
- Mining delay: the mod adds up the vanilla mining time of every block with its tool and waits that long, at most 2 seconds by default (
maxDelayTicks= 40). A countdown shows "Breaking N blocks in X s" with a progress bar. Before you click, the HUD shows the tools that will be used (with a count each), a barrier icon with the number of blocks that cannot be broken, and the estimated time (~X s). - If nothing can be broken: "No suitable tool for the selected blocks (switch to Disable mode for vanilla mining)"; if some are skipped: "N Block(s) skipped: no suitable tool".
In Creative, mass breaking is instant, needs no tools and drops nothing.
Survival replace
Off by default (SurvivalReplace.enabled). When on, the replace modes and Quick Replace work in Survival: each block in the way is mined with the rules above (tool, durability, drops into your inventory, hunger, skipping, delay shown as "Replacing N blocks in X s"), then the new block is placed and paid for. The item is checked first; without the item or a tool, nothing is mined or charged at that spot.
Undo and redo
Ctrl+Z / Ctrl+Y (or the radial menu buttons). The server keeps the last 50 actions per player (Memory.undoStackSize, 10 to 200), with a separate redo list. The lists are cleared when you log out or change dimension and are not kept over a server restart. Undo and redo happen immediately (no delay).
In Survival they follow the same rules as building and breaking:
- Undoing a build mines the placed blocks with your tools and gives you their drops (placed stone mined with a normal pickaxe gives cobblestone). Blocks you cannot mine stay.
- Undoing a break places the blocks back and costs their items (all items of multi-item blocks).
- Undoing a merge takes exactly the added item off the block without mining and gives it back.
- Undoing a replace mines the new block and restores the old one (needs survival replace and the old block's item).
- Redo works the same way in the other direction.
- Entries that fail stay in the list and are retried first next time; if nothing at all worked you get "Nothing could be undone (missing items or blocks you can't mine)". A block already back in its old state counts as undone.
In Creative, undo and redo are instant and free.
8. Items and recipes
Randomizer Bags
Put blocks in the bag as templates; building with the bag places a random block from the templates at every position. The blocks themselves are taken from your inventory (and from backpacks with a Building Upgrade), not from the bag, and only templates you actually have are picked (in Creative all of them).
- Sneak + right-click opens the bag. Each slot holds one item, and each block type fits only once.
- Right-click in Disable mode places one random block. In a build mode, hold the bag like a block: every block of the shape is a random pick (the preview shows the picks).
- With nothing left of any template: "Missing blocks in inventory for randomizer bag!"
- Renamed bags show their own name in the bag window.
| Bag | Slots | Recipe |
|---|---|---|
| Sophisticated Leather Randomizer Bag | 5 | any planks in the centre, leather above, below, left and right |
| Sophisticated Golden Randomizer Bag | 9 | leather in the centre, gold ingots on the sides, quartz in the corners |
| Sophisticated Diamond Randomizer Bag | 27 | leather in the centre, diamonds on the sides, amethyst shards in the corners |
| Omega Randomizer Bag | 54 | leather in the centre, netherite ingots on the sides, amethyst shards in the corners |
On Minecraft 1.16.x (no amethyst) the Diamond and Omega bags use prismarine crystals instead of amethyst shards.
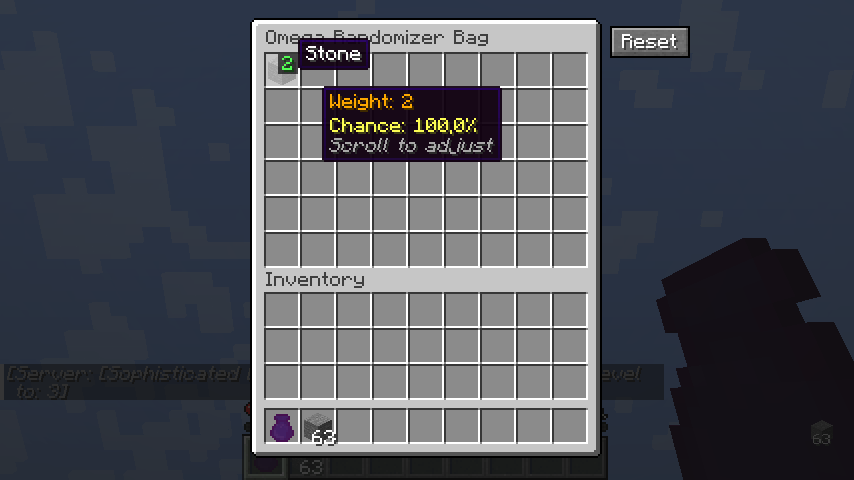
Omega weights: in the Omega bag, scroll the mouse wheel over a slot to change its weight (1, 2, 3, 4, 5, 7, 10, 15, 20, 30, 40, 50, 65, 80, 90; default 1). A badge shows each weight; pointing at a slot shows Weight and the resulting Chance in percent. Reset sets all weights back to 1. The weights are stored on the bag.
Reach Upgrades
Right-click to consume. Each one raises your power level by one (section 3) and must be used in order.
| Item | Needs power level | Gives | Recipe |
|---|---|---|---|
| Reach Upgrade 1 | 0 | level 1 | 4 slime balls around an ender pearl (plus shape) |
| Reach Upgrade 2 | 1 | level 2 | 4 blaze powder around an ender pearl (plus shape) |
| Reach Upgrade 3 | 2 | level 3 | end crystal in the centre, chorus fruit on the sides, ghast tears in the corners |
Using one out of order says "Use Reach Upgrade N first."; using one you already have says "Already used this upgrade!". Your power level is kept on death.
Compressed blocks
Crafting materials for the Building Upgrades: 9 blocks in a 3x3 give 1 compressed block, and 1 compressed block crafts back into 9.
| Item | Made from |
|---|---|
| Compressed Dirt | 9 dirt |
| Compressed Cobblestone | 9 cobblestone |
| Compressed Sand | 9 sand |
| Compressed Cobbled Deepslate | 9 cobbled deepslate (9 blackstone on Minecraft 1.16.x) |
Building Upgrades
Backpack upgrades for Sophisticated Backpacks (section 9). Each tier is crafted from the previous one:
| Item | Blocks per build from backpacks | Recipe |
|---|---|---|
| Building Upgrade Tier 1 | 32 | 8 Compressed Dirt around a Sophisticated Backpacks Upgrade Base |
| Building Upgrade Tier 2 | 64 | 8 Compressed Cobblestone around Tier 1 |
| Building Upgrade Tier 3 | 128 | 8 Compressed Sand around Tier 2 |
| Building Upgrade Tier 4 | 256 | 8 Compressed Cobbled Deepslate around Tier 3 |
| Omega Building Upgrade | 2048 | 7 netherite blocks, Tier 4 in the centre, a nether star bottom-centre |
The recipes only exist when Sophisticated Backpacks is installed.
9. Sophisticated Backpacks integration
Building Upgrade
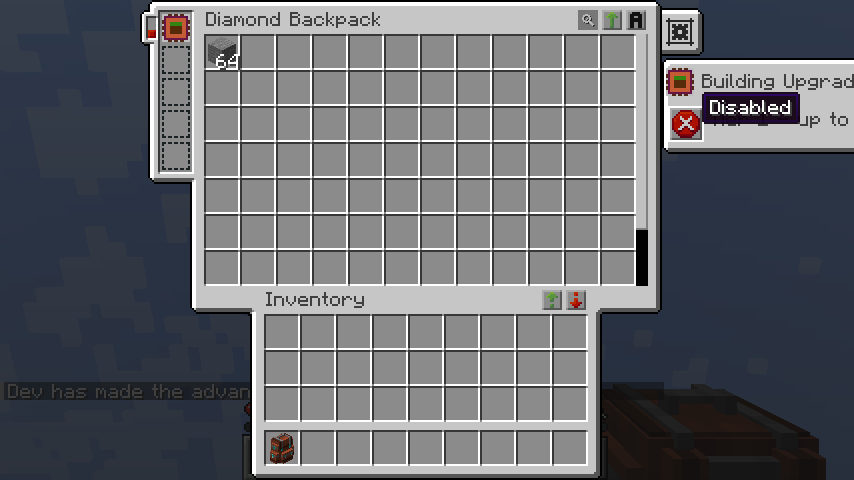
Put a Building Upgrade into a backpack's upgrade slot. While it is enabled, builds take blocks from that backpack before your inventory. The tier sets how many blocks one build may take from your backpacks: 32, 64, 128, 256 or 2048 (Omega). It does not raise your power-level limits (reach, blocks per axis, blocks placed at once); those still apply. Anything above the tier limit comes from your inventory.
- One per backpack ("Only one building upgrade can be installed per backpack"); you can swap it for another tier directly.
- Several backpacks: all backpacks you carry with an enabled upgrade supply blocks; the limit is the highest tier among them.
- Where backpacks count: main inventory, offhand, the chest slot, and worn backpacks in Curios (Forge, NeoForge), Trinkets or Accessories slots, as far as Sophisticated Backpacks itself supports them.
- Matching: a backpack stack must be the same item with the same data as the block you build with.
- Settings tab: the upgrade has a tab in the backpack window with an Enabled / Disabled button and "Tier N - up to M blocks". A disabled upgrade supplies nothing.
- HUD: the block counts on screen include the blocks in your backpacks (section 10).
- Tooltip: "Place up to N blocks at once from backpack inventory".
Tool Swapper
Survival mass breaking also uses the tools stored in a backpack that has an enabled Tool Swapper or Advanced Tool Swapper upgrade (not set to "no swap"). The Advanced Tool Swapper's filter is respected. Durability is taken from the tool in the backpack.
Where the integration exists
| Loader | Minecraft versions with integration |
|---|---|
| NeoForge | every NeoForge version: 1.20.4, 1.21/1.21.1, 1.21.4, 1.21.5, 1.21.8, 1.21.10, 1.21.11, 26.1/26.1.1, 26.1.2, 26.2, and 1.20.1 through the Forge jar |
| Forge | 1.16.3, 1.16.4, 1.16.5, 1.17.1, 1.18, 1.18.1, 1.18.2, 1.19/1.19.1, 1.19.2, 1.20.1 |
| Fabric (unofficial Fabric port of Sophisticated Backpacks) | 1.19.2, 1.19.4 (beta builds), 1.20.1, 1.20.4, 1.21.1 |
Everywhere else (for example Fabric 1.21.4 or Forge 1.20.4 and newer) there is no Sophisticated Backpacks build for that loader, and the mod runs standalone.
Without Sophisticated Backpacks
Everything else works. The five Building Upgrade items still exist (so worlds and item lists stay intact) but are inert placeholders without recipes and without any effect. Nothing is read from backpacks and mass breaking only uses your own tools.
10. Player Settings and HUD
Player Settings screen
Open it with the button at the top left of the radial menu or the key Open Player Settings (unbound by default). Switches are ON/OFF buttons, numbers are sliders (arrow keys move one step). Changes apply at once; Done or Escape saves them to your client config; Reset to Defaults restores all values. Every setting has a tooltip.
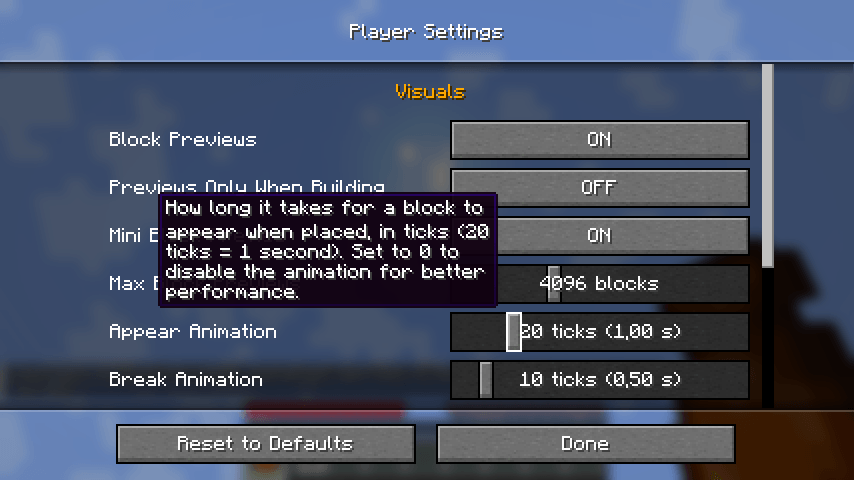
| Setting | Default | Range | What it does |
|---|---|---|---|
| Visuals | |||
| Block Previews | ON | Show ghost blocks while building. | |
| Previews Only When Building | ON | Only show previews while you use a build mode. | |
| Mini Block Preview | ON | Small block inside each preview to show its rotation (same as the radial toggle). | |
| Max Block Previews | 4096 blocks | 0 - 100000 (0 = outline only) | Above this many blocks only the outline is drawn. |
| Appear Animation | 5 ticks | 0 - 100 (0 = off) | How long a placed block takes to appear. |
| Break Animation | 10 ticks | 0 - 100 (0 = off) | Length of the break animation. |
| Preview Scale | 25% | 5% - 100% | Size of the ghost blocks. |
| Performance | |||
| Preview Distance | 64 blocks | 16 - 256 | No individual previews beyond this distance. |
| Update Throttling | ON | Skip preview calculations while you do not move. | |
| Max Mini Previews | 4096 blocks | 0 - 100000 (0 = no limit) | Maximum number of mini block previews. |
HUD
- While building: outline and ghost blocks;
N blocks (W x D x H)above the hotbar; the hint Left-click to cancel, Right-click to place (or Left-click to break, Right-click to cancel); the list of needed blocks at the left edge (5x Stone). - Next to the crosshair (placing): the blocks the build uses with their counts; red counts for missing blocks. In Creative only when a build uses more than one block type.
- Next to the crosshair (Survival breaking): the tools that will be used with how many blocks each, a barrier icon with the number of blocks that cannot be broken, and the estimated time
~X s. - Below the crosshair: the mining countdown "Breaking N blocks in X s" / "Replacing N blocks in X s" with a red progress bar.
- Bottom right (Survival): how many of the held block (or of each template of a held Randomizer Bag) you have in your inventory and backpacks, shortened like
11.2k. - Radial menu, bottom right: your power level; point at it for all current and next-level limits.
11. Configuration
There are three config files. Every option below lists its default and allowed range.
| File | Fabric | NeoForge / Forge | Scope |
|---|---|---|---|
| Client | config/sophisticatedbuilding-client.json |
config/sophisticatedbuilding-client.toml |
Your own previews (also editable in the Player Settings screen) |
| Common | config/sophisticatedbuilding-common.json |
config/sophisticatedbuilding-common.toml |
Power level limits |
| Server | config/sophisticatedbuilding-server.json |
<world>/serverconfig/sophisticatedbuilding-server.toml |
Rules the server enforces; sent to clients on join |
- Fabric: a broken or out-of-date file is corrected automatically (missing keys added, values clamped, unknown keys removed); the old file is kept as
<name>.json.bak(then-1,-2, …). A file that is not valid JSON is left untouched and defaults are used. - NeoForge: config screen in the mod list (not on 1.20.4). Forge: no config screen; edit the files.
- The common config is read on both sides; keep the client's and server's copy the same.
Server config
| Option | Default | Range | Meaning |
|---|---|---|---|
Validation.allowInSurvival |
true | Allow the mod in Survival. If false, only Creative players can use it. | |
Validation.useWhitelist |
false | Only players in the whitelist may use the mod. | |
Validation.whitelist |
["Player1", "Player2"] |
Player names for the whitelist (not sent to clients). | |
Validation.maxBlocksPlacedAtOnce |
10000 | 1 - 100000 | Final server check: larger builds are refused. |
Memory.undoStackSize |
50 | 10 - 200 | Undo (and redo) steps per player. Needs a world restart. |
SurvivalBreaking.enabled |
true | Mass breaking in Survival. | |
SurvivalBreaking.stopBeforeToolBreaks |
true | Never use a tool with only 1 use left. | |
SurvivalBreaking.maxDelayTicks |
40 | 0 - 1200 | Longest mining delay of one survival break or replace (20 ticks = 1 s). |
SurvivalBreaking.exhaustionPerBlock |
0.005 | 0.0 - 1.0 | Hunger exhaustion per broken block. |
SurvivalReplace.enabled |
false | Replace modes and Quick Replace in Survival (blocks in the way are mined like survival breaking). |
Common config (power level limits)
| Option | Creative | Level 0 | Level 1 | Level 2 | Level 3 | Range |
|---|---|---|---|---|---|---|
Reach |
200 | 0 | 8 | 16 | 32 | 0 - 1000 |
MaxBlocksPlacedAtOnce |
10000 | 128 | 256 | 512 | 2048 | 0 - 100000 |
MaxBlocksPerAxis |
1000 | 8 | 16 | 24 | 32 | 0 - 1000 |
MaxMirrorRadius |
200 | 16 | 32 | 48 | 64 | 0 - 1000 |
A level-0 limit of 0 for blocks placed at once or blocks per axis disables the build modes until the power level is raised.
Client config
The ten Player Settings above: Visuals.showBlockPreviews, onlyShowBlockPreviewsWhenBuilding, showMiniBlockPreview, maxBlockPreviews, appearAnimationLength, breakAnimationLength, previewScale, and Performance.previewRenderDistance, enableUpdateThrottling, maxMiniBlockPreviews.
12. Controls and commands
All keys are in Options > Controls, category Sophisticated Building.
| Key | Default | Action |
|---|---|---|
| Radial Menu | Left Alt (hold) | Choose build modes, options and actions |
| Modifier Menu | Numpad + | Open or close the Modifier Settings |
| Undo | Ctrl + Z | Undo the last build or break |
| Redo | Ctrl + Y | Redo |
| Activate Previous Build Mode | not bound | Switch back to the previous build mode |
| Toggle Disabled <> Previous Build Mode | not bound | Switch between Disable and your last build mode |
| Open Player Settings | not bound | Open the Player Settings screen |
Mouse: right-click places / sets points, left-click breaks / cancels a placement, sneak + right-click a Randomizer Bag opens it, mouse wheel over an Omega bag slot changes its weight.
Commands (operator permission level 2):
/powerlevel query- show your power level./powerlevel query <player>- show a player's./powerlevel set <player> <0-3>- set a player's power level.
13. Supported versions and compatibility
One jar per Minecraft version and loader; the file name says both: sophisticatedbuilding-<loader>-<minecraft>-5.0.0.jar. Install it on the client and the server.
| Minecraft | Fabric | NeoForge | Forge | Backpacks integration | Java |
|---|---|---|---|---|---|
| 26.2 | yes | yes | yes | NeoForge | 25 |
| 26.1.2 | yes (jar for 26.1 - 26.1.2) | yes | yes (jar for 26.1 - 26.1.2) | NeoForge | 25 |
| 26.1, 26.1.1 | the 26.1.2 jar | own jar (NeoForge beta builds) | the 26.1.2 jar | NeoForge | 25 |
| 1.21.11, 1.21.10, 1.21.8, 1.21.5, 1.21.4 | yes | yes | yes | NeoForge | 21 |
| 1.21.1 | yes (jar for 1.21 - 1.21.1) | yes (jar for 1.21 - 1.21.1) | yes | Fabric, NeoForge | 21 |
| 1.21 | the 1.21.1 jar | the 1.21.1 jar | own jar | NeoForge | 21 |
| 1.20.4 | yes | yes | yes | Fabric, NeoForge | 17 |
| 1.20.1 | yes | the Forge jar | yes | Fabric, Forge, NeoForge | 17 |
| 1.19.4 | yes | - | yes | Fabric (beta port) | 17 |
| 1.19.2 | yes (jar for 1.19 - 1.19.2) | - | yes | Fabric, Forge | 17 |
| 1.19, 1.19.1 | the 1.19.2 jar | - | own jar for both | Forge | 17 |
| 1.18.2 | yes | - | yes | Forge | 17 |
| 1.18.1, 1.18 | one jar for both | - | one jar each | Forge | 17 |
| 1.17.1 | yes | - | yes | Forge | 16 |
| 1.16.5, 1.16.4 | one jar for both | - | one jar each | Forge | 8 |
| 1.16.3 | yes | - | yes | Forge | 8 |
Fabric needs Fabric API. Minimum loader versions are in each file's details; the jar refuses older Sophisticated Backpacks/Core builds at loading with a message naming the version.
Version notes
- NeoForge 26.1 / 26.1.1: NeoForge only released beta builds; the
neoforge-26.1jar needs 26.1.0.19-beta or newer. With Sophisticated Backpacks use Backpacks 26.1-3.25.48 with Core 26.1-1.4.26: Core 1.4.27 needs NeoForge 26.1.2 and crashes the beta builds when a backpack is opened, so the jar refuses it. - Minecraft 1.20.1 on NeoForge: use the Forge jar (tested on NeoForge 1.20.1-47.1.106).
- Forge 1.16.3 and 1.16.4 servers: Forge 34 and 35 do not start on Java 8u321 or newer (with or without this mod); use an older Java 8 for the dedicated server. The Minecraft launcher's own Java 8 is fine.
- Minecraft 1.16.3 (Forge): the Sophisticated Backpacks build for 1.16.3 has no Tool Swapper and no upgrade slot checks (a backpack can hold more than one Building Upgrade; it counts once, with its highest enabled tier).
- Minecraft 1.16.x - 1.18.x (Forge): one Building Upgrade per backpack is enforced by the upgrade itself; on 1.18.x take the installed one out to change the tier.
- Minecraft 1.19.4 (Fabric): the Sophisticated Backpacks Fabric port only has beta builds for 1.19.4 (tested with Backpacks 3.19.5 build 105 and Core 0.5.109).
- Minecraft 1.21 (Fabric): the Fabric port has no 1.21 build; the integration works on 1.21.1.
- Recipes on 1.16.x: no deepslate or amethyst, so Compressed Cobbled Deepslate uses blackstone and the Diamond and Omega bags use prismarine crystals.
- Key category: since Minecraft 1.21.9 the key category id is
key.category.sophisticatedbuilding.main(custom language packs need the new key; your bindings are kept).
Other mods
- Protection and claim mods: on NeoForge and Forge every block the mod places or breaks fires the normal place and break events, so claims and protection mods can refuse them (refused blocks are not charged). On Fabric there is no such standard event; spawn protection, the world border and adventure-mode rules are always respected.
- Storage blocks (shulker boxes, Supplementaries sacks, …) keep their contents and name when placed by a build.
- Items that use right-click while you hold them (for example a wrench) are not blocked: the mod only takes over placement while you hold a block item.
- The mod does not need Create, Flywheel or Ponder; the preview rendering is built in.
Known issues
- Fabric: your power level and modifier settings are only kept while the server (or your singleplayer game) runs; after a restart they start from level 0 and an empty modifier list. NeoForge and Forge save them with the player.
- Forge: loading a singleplayer world directly with
--quickPlaySingleplayercan crash with "Can not retrieve LootModifierManager until resources have loaded once" - a Forge bug that also happens without this mod. - Fabric: the unofficial Sophisticated Backpacks Fabric port logs a harmless
No data fixer registered forerror at start-up.
14. FAQ and troubleshooting
Blocks are not taken from my backpack. Check that the backpack has a Building Upgrade, that it is Enabled in its tab, that the blocks in the backpack are exactly the same item with the same data as the ones you build with, and that Sophisticated Backpacks exists for your loader and version (section 9). Remember the tier limit: a Tier 1 upgrade supplies at most 32 blocks per build.
The preview does not show. Make sure you are in a build mode (not Disable) and hold a block or a Randomizer Bag. Check Block Previews in the Player Settings. Big builds show only the outline above Max Block Previews, and nothing beyond Preview Distance. In Survival at power level 0 you have vanilla reach, so aim at a nearby block.
The radial menu says build modes are disabled. Your power level allows 0 blocks (a server setting). Use a Reach Upgrade or ask an operator.
Mass breaking does nothing or skips blocks. You need an effective tool (in your inventory or a Tool Swapper backpack); tools with 1 use left are not used; protected, unbreakable and tile-entity blocks are skipped; the server may have disabled survival breaking. Use Disable mode for normal mining.
I cannot replace blocks in Survival. Survival replace is off by default. Ask the server owner to set SurvivalReplace.enabled = true.
Undo did not give my stone back, I got cobblestone. In Survival, undo mines the blocks like normal mining, so you get their normal drops.
My config was reset / there is a .bak file. On Fabric a config file with wrong values or unknown keys is corrected automatically and the old version is kept as sophisticatedbuilding-<name>.json.bak. Compare the two and copy your values back into the valid range.
What should I send with a bug report? Minecraft version, loader and its version, the Sophisticated Building jar name, Sophisticated Backpacks/Core versions if installed, logs/latest.log (and the crash report from crash-reports/ if the game crashed), and the steps to reproduce. Report issues at https://github.com/navrelis/EffortlessBuildingSophisticated/issues.
15. Dependencies
- Required: Fabric API on Fabric. Nothing else on NeoForge or Forge.
- Optional: Sophisticated Backpacks (with Sophisticated Core) for the Building Upgrade and Tool Swapper features; on Fabric the unofficial Fabric port. Curios, Trinkets or Accessories for worn backpacks, as supported by Sophisticated Backpacks.
16. Attribution
Sophisticated Building is based on Effortless Building by Requios (CurseForge project ID 302113), who created the original mod and the concept of build modes and modifiers. Original page: https://www.curseforge.com/minecraft/mc-mods/effortless-building
This fork is maintained by Navrelis and licensed under LGPL-3.0-only. Source code: https://github.com/navrelis/EffortlessBuildingSophisticated
Effortless Building: Sophisticated (Enhanced Fork) Team

Owner