


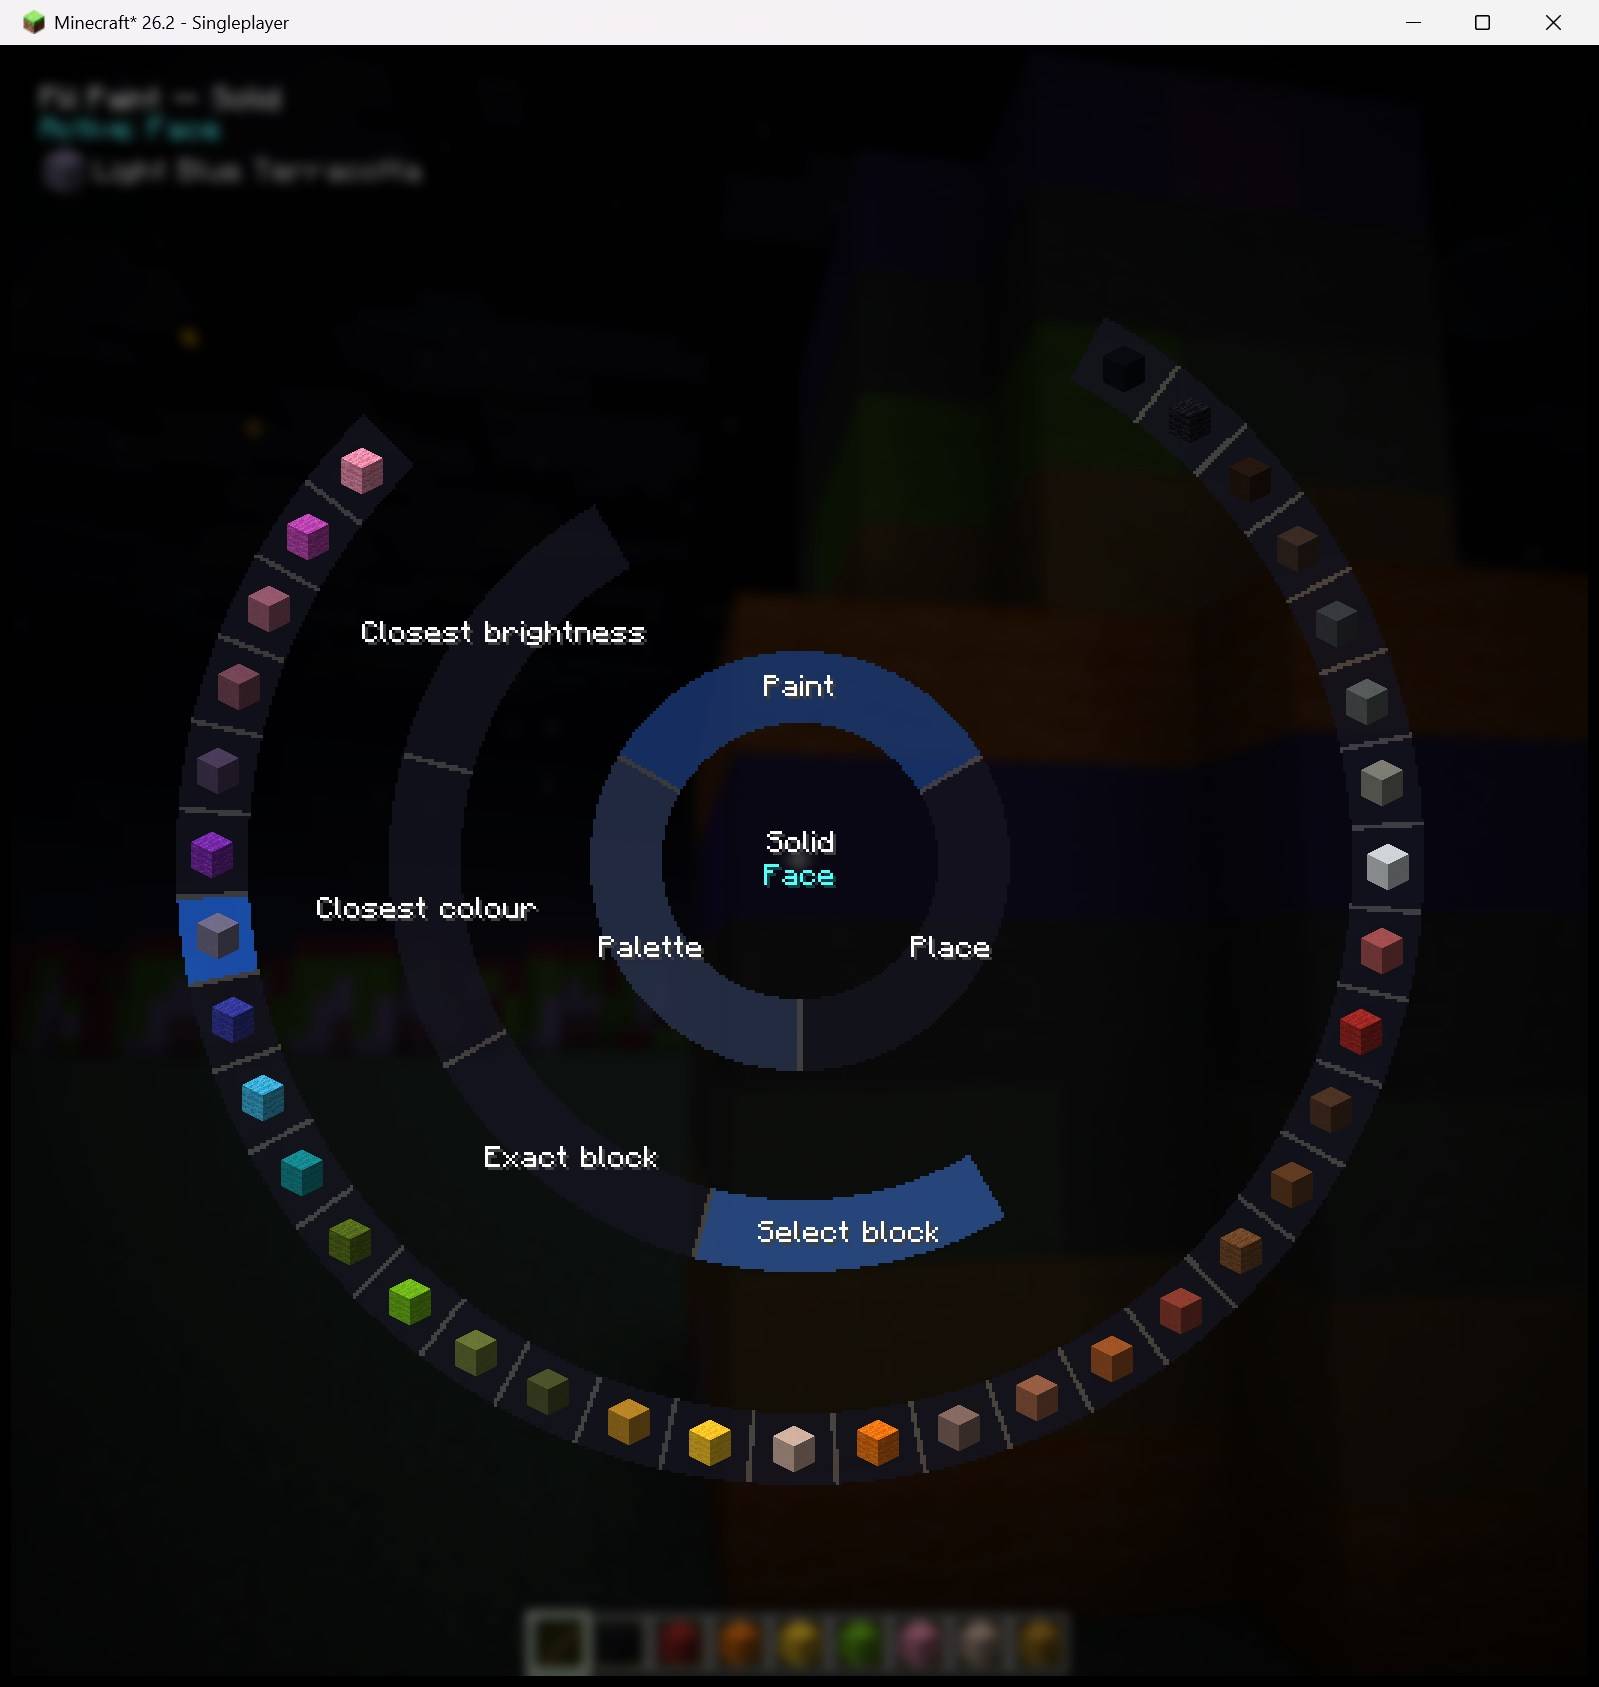
selector-wheel-solid-block-picker-v2.2.0.jpg
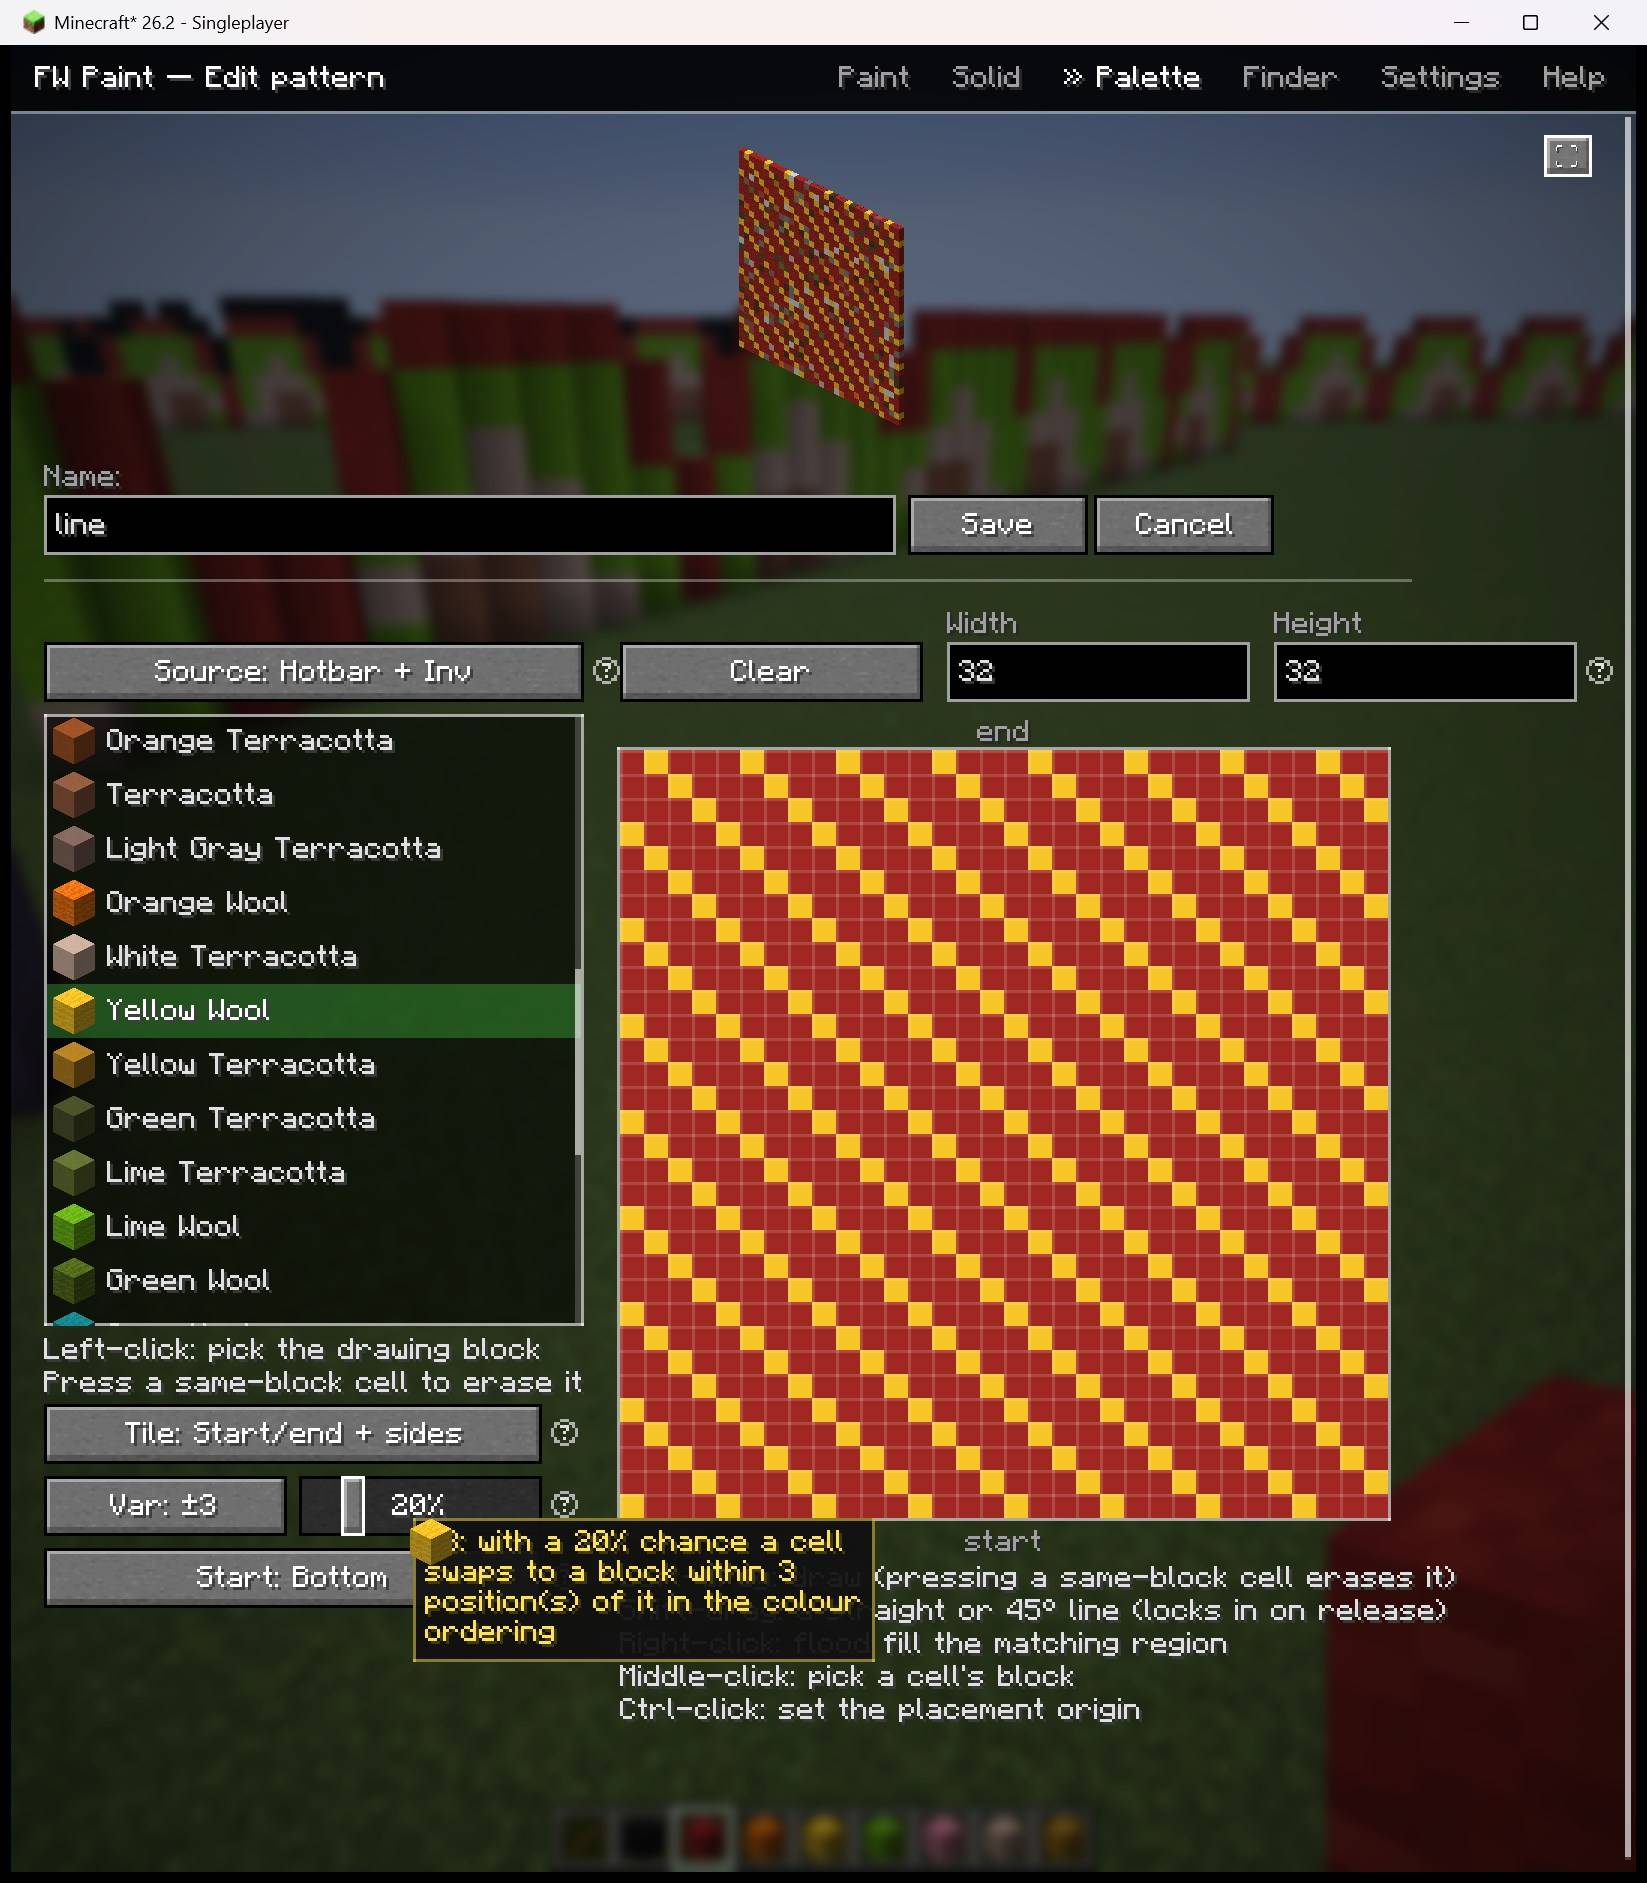
pattern-editor-variation-shimmer-preview-v2.1.0-beta.1.jpg
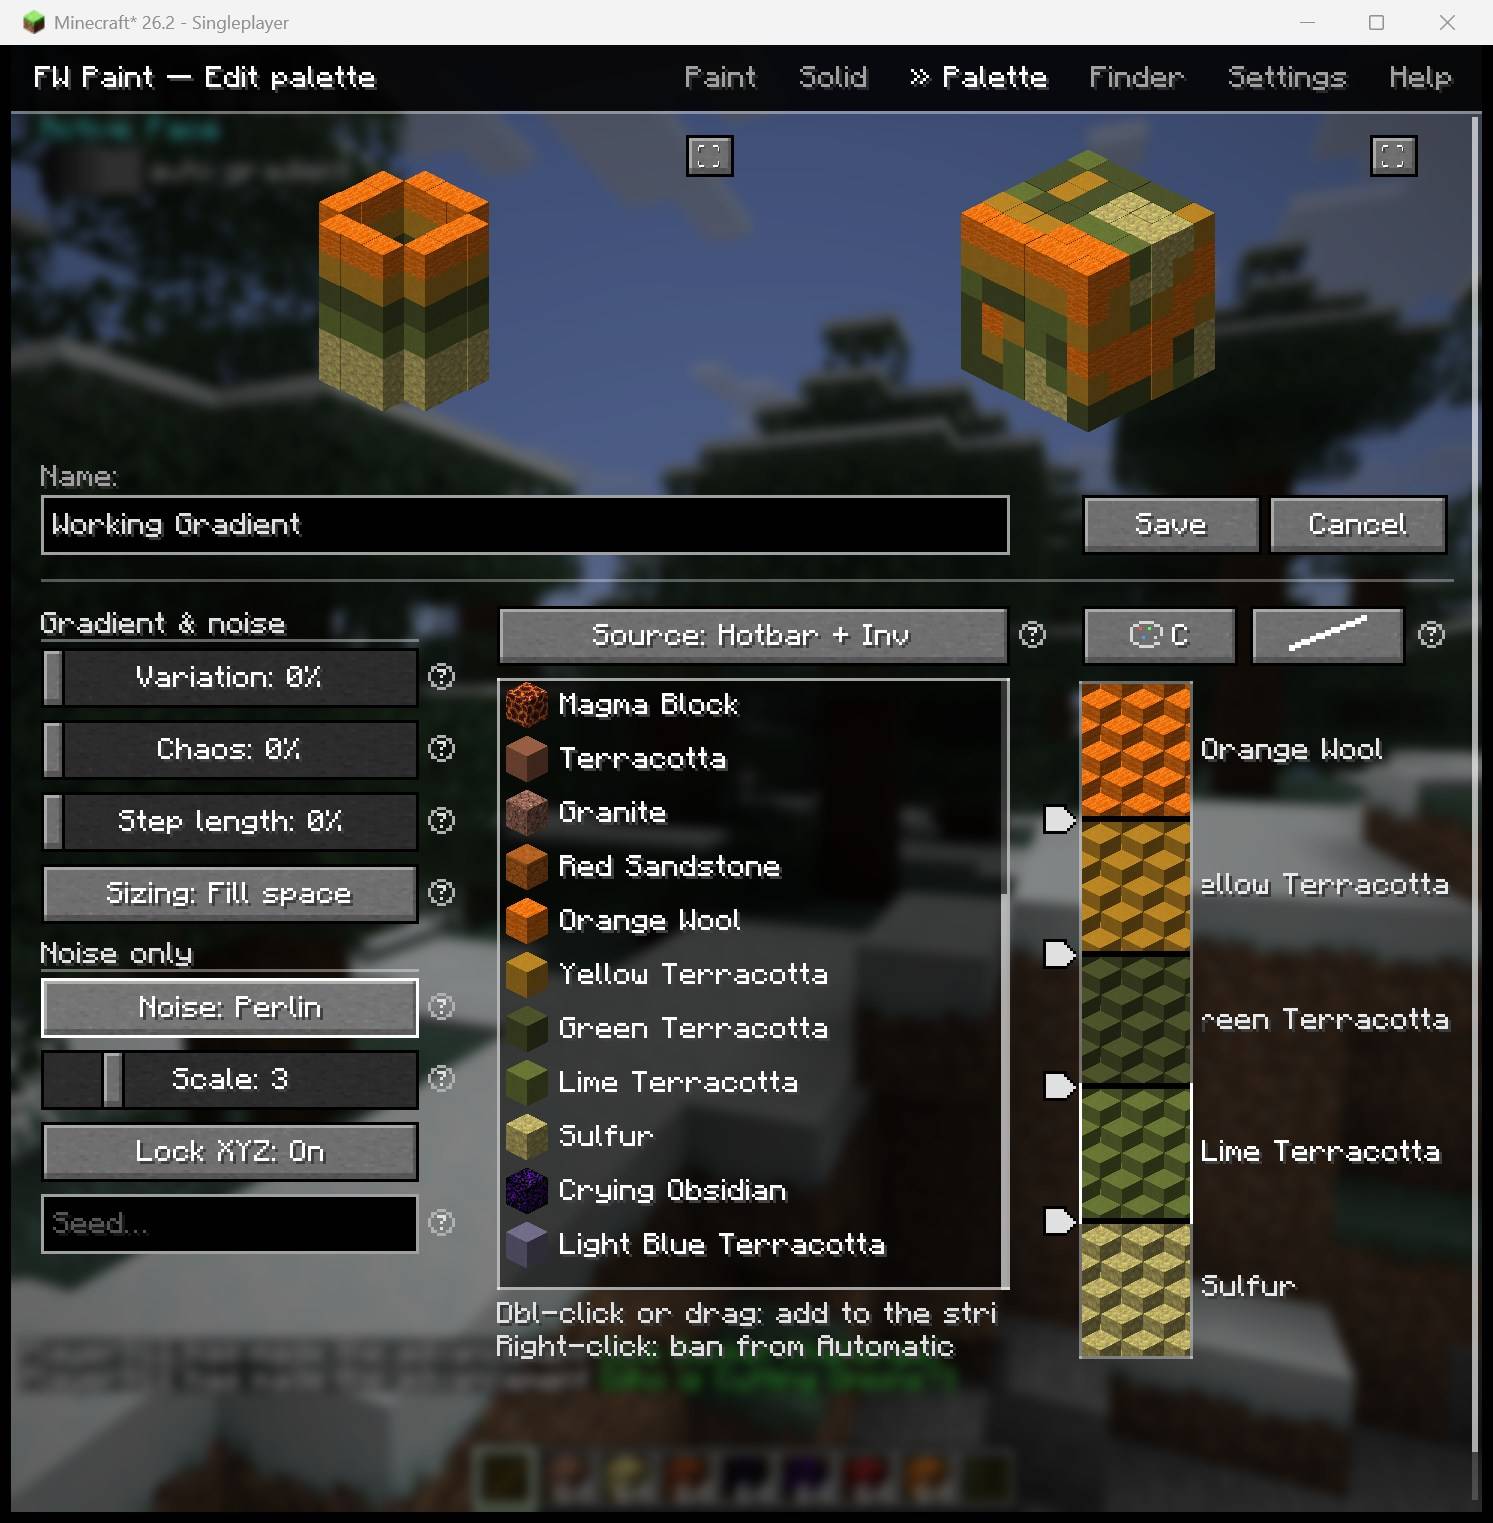
palette-editor-segment-strip-previews-v2.0.0-beta.1.jpg
Description
FW Paint
Open source (MIT) — github.com/nullabork/fw-paint-fabric
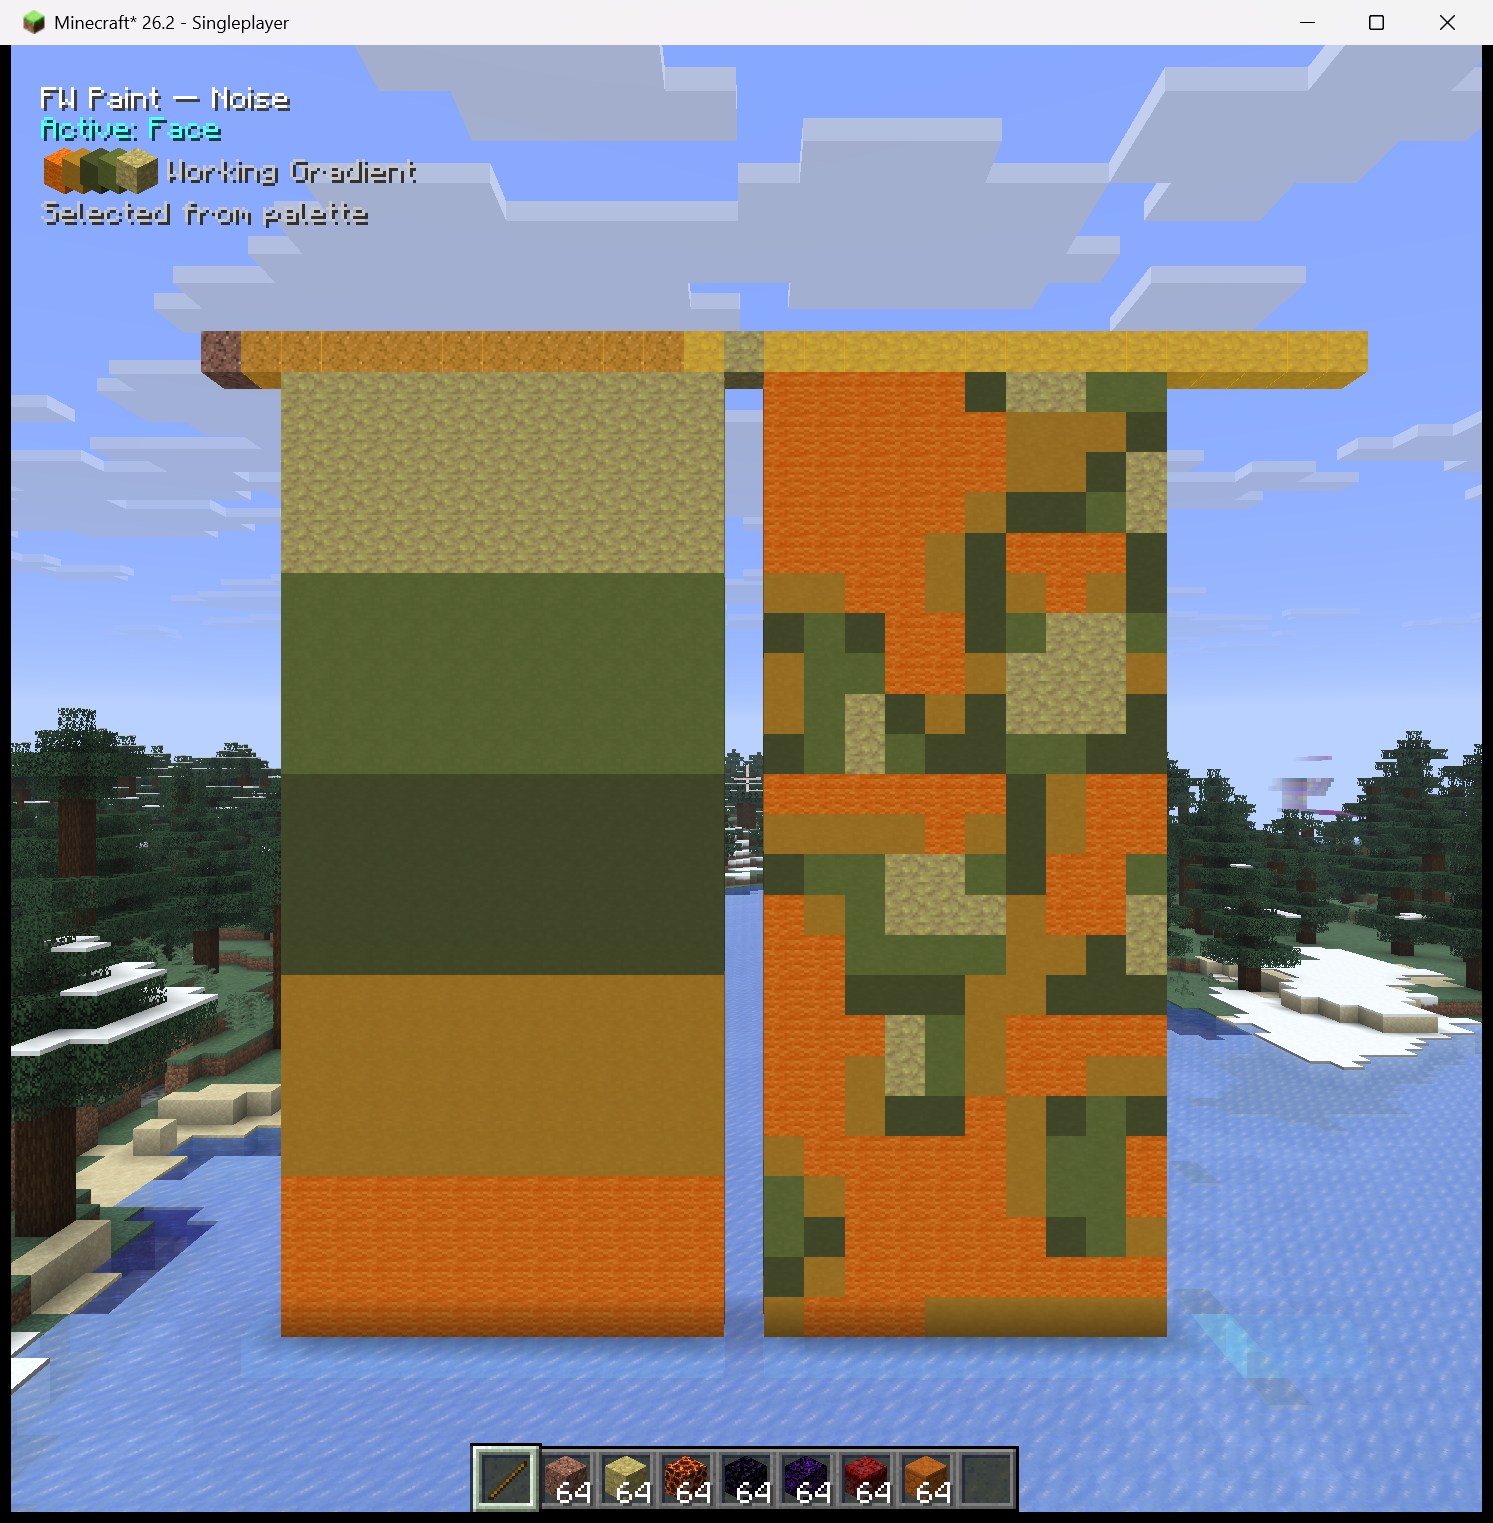
Paint with blocks. A client-side mod (Fabric and NeoForge) with four paints — Solid (one block: walls, columns, volumes), Gradient (smooth colour/brightness blends), Noise (natural, blotchy 3D patterns), and Pattern (hand-drawn 2D block grids painted as planes) — driven by Palettes: named, saved block ramps and patterns you build once and reuse everywhere. A Finder tab ranks every block in the game by colour. Any paint works through any placement mode, with or without markers. Fluids count as empty space — paint under water or lava exactly as in air. Placement is the legit, multiplayer-safe way (normal block-place interactions the server validates), so it works on servers.
v2. Palettes replace v1's per-tool block picker. v1 gradient settings are not migrated — build your first palette on the Palette tab and you're going again in a minute.
OK, but how do I actually use this?
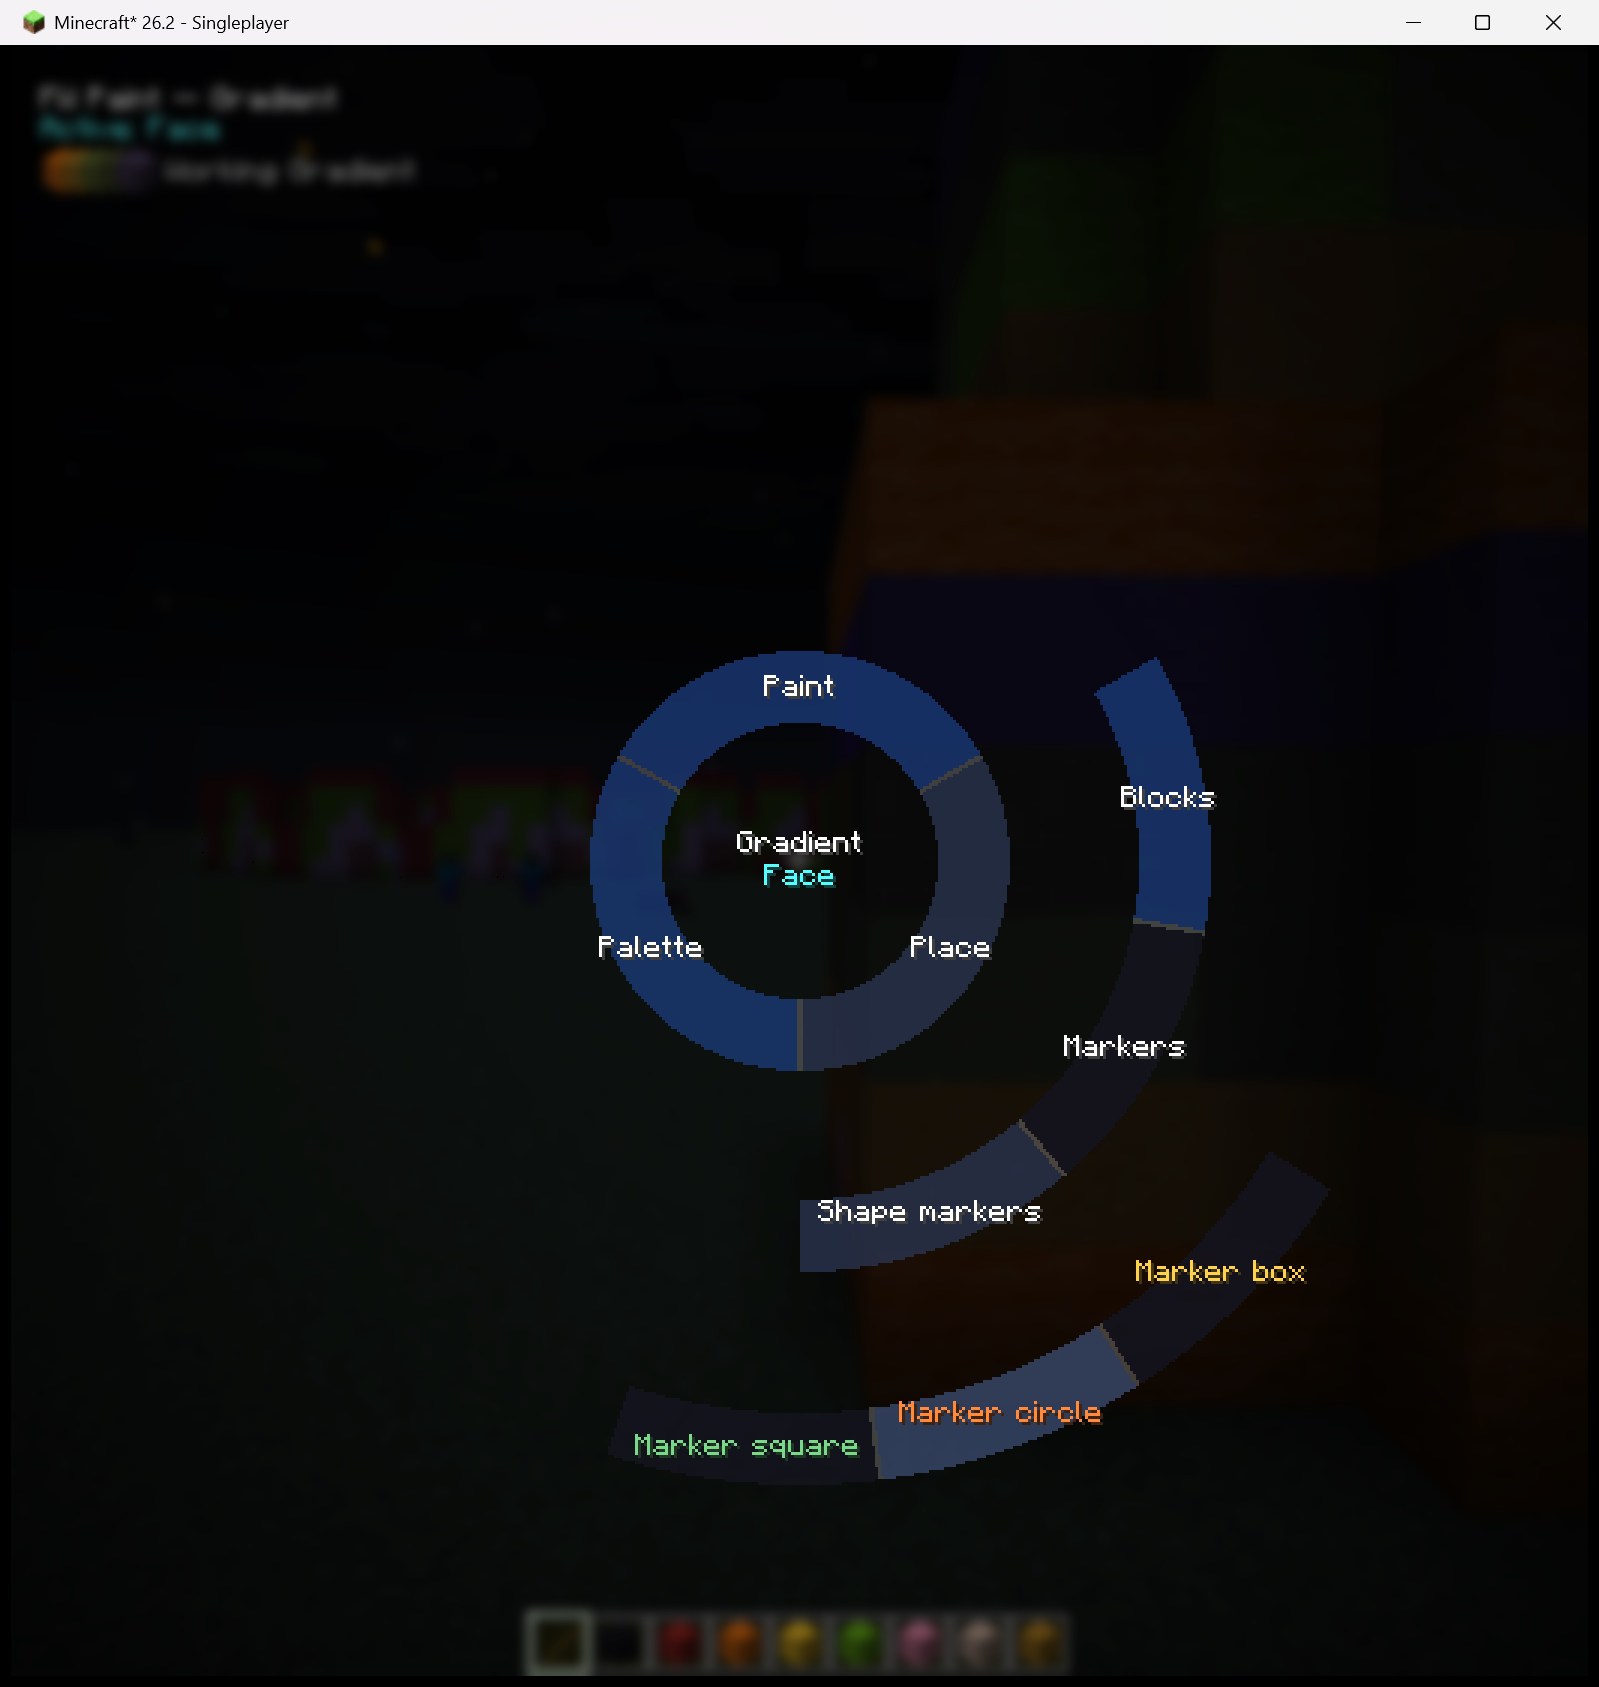
Two ideas run the whole mod. One: nothing happens unless you're holding your chosen paint tool item (a stick is traditional), so your hands stay safe for normal play. Two: everything you'd ever switch lives on one radial menu — hold G, hover a wedge to fan it out, click an option, release. WHAT you paint (Solid / Gradient / Noise / Pattern) and WHERE blocks go (single blocks, whole faces, 3D fills) are two independent wheel choices, and the helper text in the top-left always shows what's active.
The 60-second version:
- Press K → Settings → Paint tool → pick any item.
- Hold that item. Hold G → hover Paint → click Solid.
- Still on the wheel: hover Palette → Select block → click a block from your inventory.
- Release G, aim at any block face, right-click. You're painting — hold to keep going.
From there it deepens as far as you like: palettes blend gradients and noise along your build, patterns paint hand-drawn grids, and markers + shape regions (boxes, circles, squares) aim and bound everything — a giant gradient cylinder is a two-minute job. The in-game Help tab is a drill-down manual for every piece.
Every input
| Input | Does |
|---|---|
| K | Open / close the FW Paint screen (settings, palettes, finder, help) |
| G (hold) | The selector wheel: paint type, placement mode, palette/block — everything |
| B | Cycle your saved palettes (or patterns, under Pattern paint) |
| L-Ctrl | Modifier: clear connected markers · reverse extrude · +scroll extrudes shapes |
| Right-click | Paint (hold to keep going); place end markers in marker modes |
| Left-click | Place start markers; drag shape controls |
| Middle-click | Remove whatever marker or shape you're aiming at |
| Scroll (on a shape) | Slide it along its axis |
Keys are rebindable under Options → Controls → Key Binds → FW Paint.
The selector wheel
Hover a wedge to fan out its options; click only to choose. Paint fans the paint types (Solid / Gradient / Pattern / Noise); Place fans Blocks (Single / Face / Face perp / 3D Fill), Markers (Marker / Marker draw), and Shape markers (Marker box / circle / square) onto a third ring; Palette follows the paint type (palettes, patterns, or — with Solid paint — the match modes, with Select block fanning your inventory's blocks in colour order). The wedge directly holding the current selection shows a blue tint; segments size themselves to their content (block icons pack tight), and anything that still doesn't fit scrolls as a carousel (arrows or mouse wheel). Set several things in one hold, then release — or click a tab on the bar along the top to jump straight into that settings page (it stays open when you let go of G).
Palettes
One palette drives both gradient and noise painting. The Palette tab lists every palette you've saved — name, its segment sprites, an expandable summary, and a red border when its blocks aren't in your inventory (by default painting refuses then; a Settings toggle can skip the missing segments instead). Use / Edit / Delete above the list; the HUD shows the active palette and B cycles them in-game.
The editor: two live previews on top (a gradient cylinder and a noise cube, each expandable), your colour-sorted inventory blocks in the middle, and the segment strip on the right:
- Double-click or drag blocks into the strip; drag a segment up/down to reorder, sideways out to remove; drag the pointed stop handles to resize segments — placement uses exactly the shares you drew (the Curve turns Custom).
- Order and Curve icon-buttons above the strip: sort by colour or brightness (asc/desc), pick an easing (Linear / Ease In / Ease Out / Ease In-Out / Step) — or shape your own by hand.
- Auto segments — the crosshatched wildcards: Auto colour and Auto brightness resolve to a real inventory block when you paint, deterministically: at the strip's start they read the block you started on; at the end they scan to an end marker or the first solid block — and if there's nothing to find, they pick the opposite of your start (lightest↔darkest for brightness, the furthest colour for colour) so you still get a full ramp. A strip of nothing but Autos is a reusable "gradient from whatever I'm standing on". Right-click a block in the list to ban it from Auto picks.
- Sizing: Min blocks (shortest run that fits the ratios), Fill space (out to the end marker / first block), or Set steps (fixed length).
- Variation (a ±1–±3 colour-neighbour window + a swap chance — cells shimmer to nearby colours from your inventory), Chaos (repeat/skip dither), Step length (steps randomly run longer/shorter) — plus the palette's own noise type / scale / seed.
- Hover any control (or click its circled-?) for help describing what it's currently set to.
Patterns
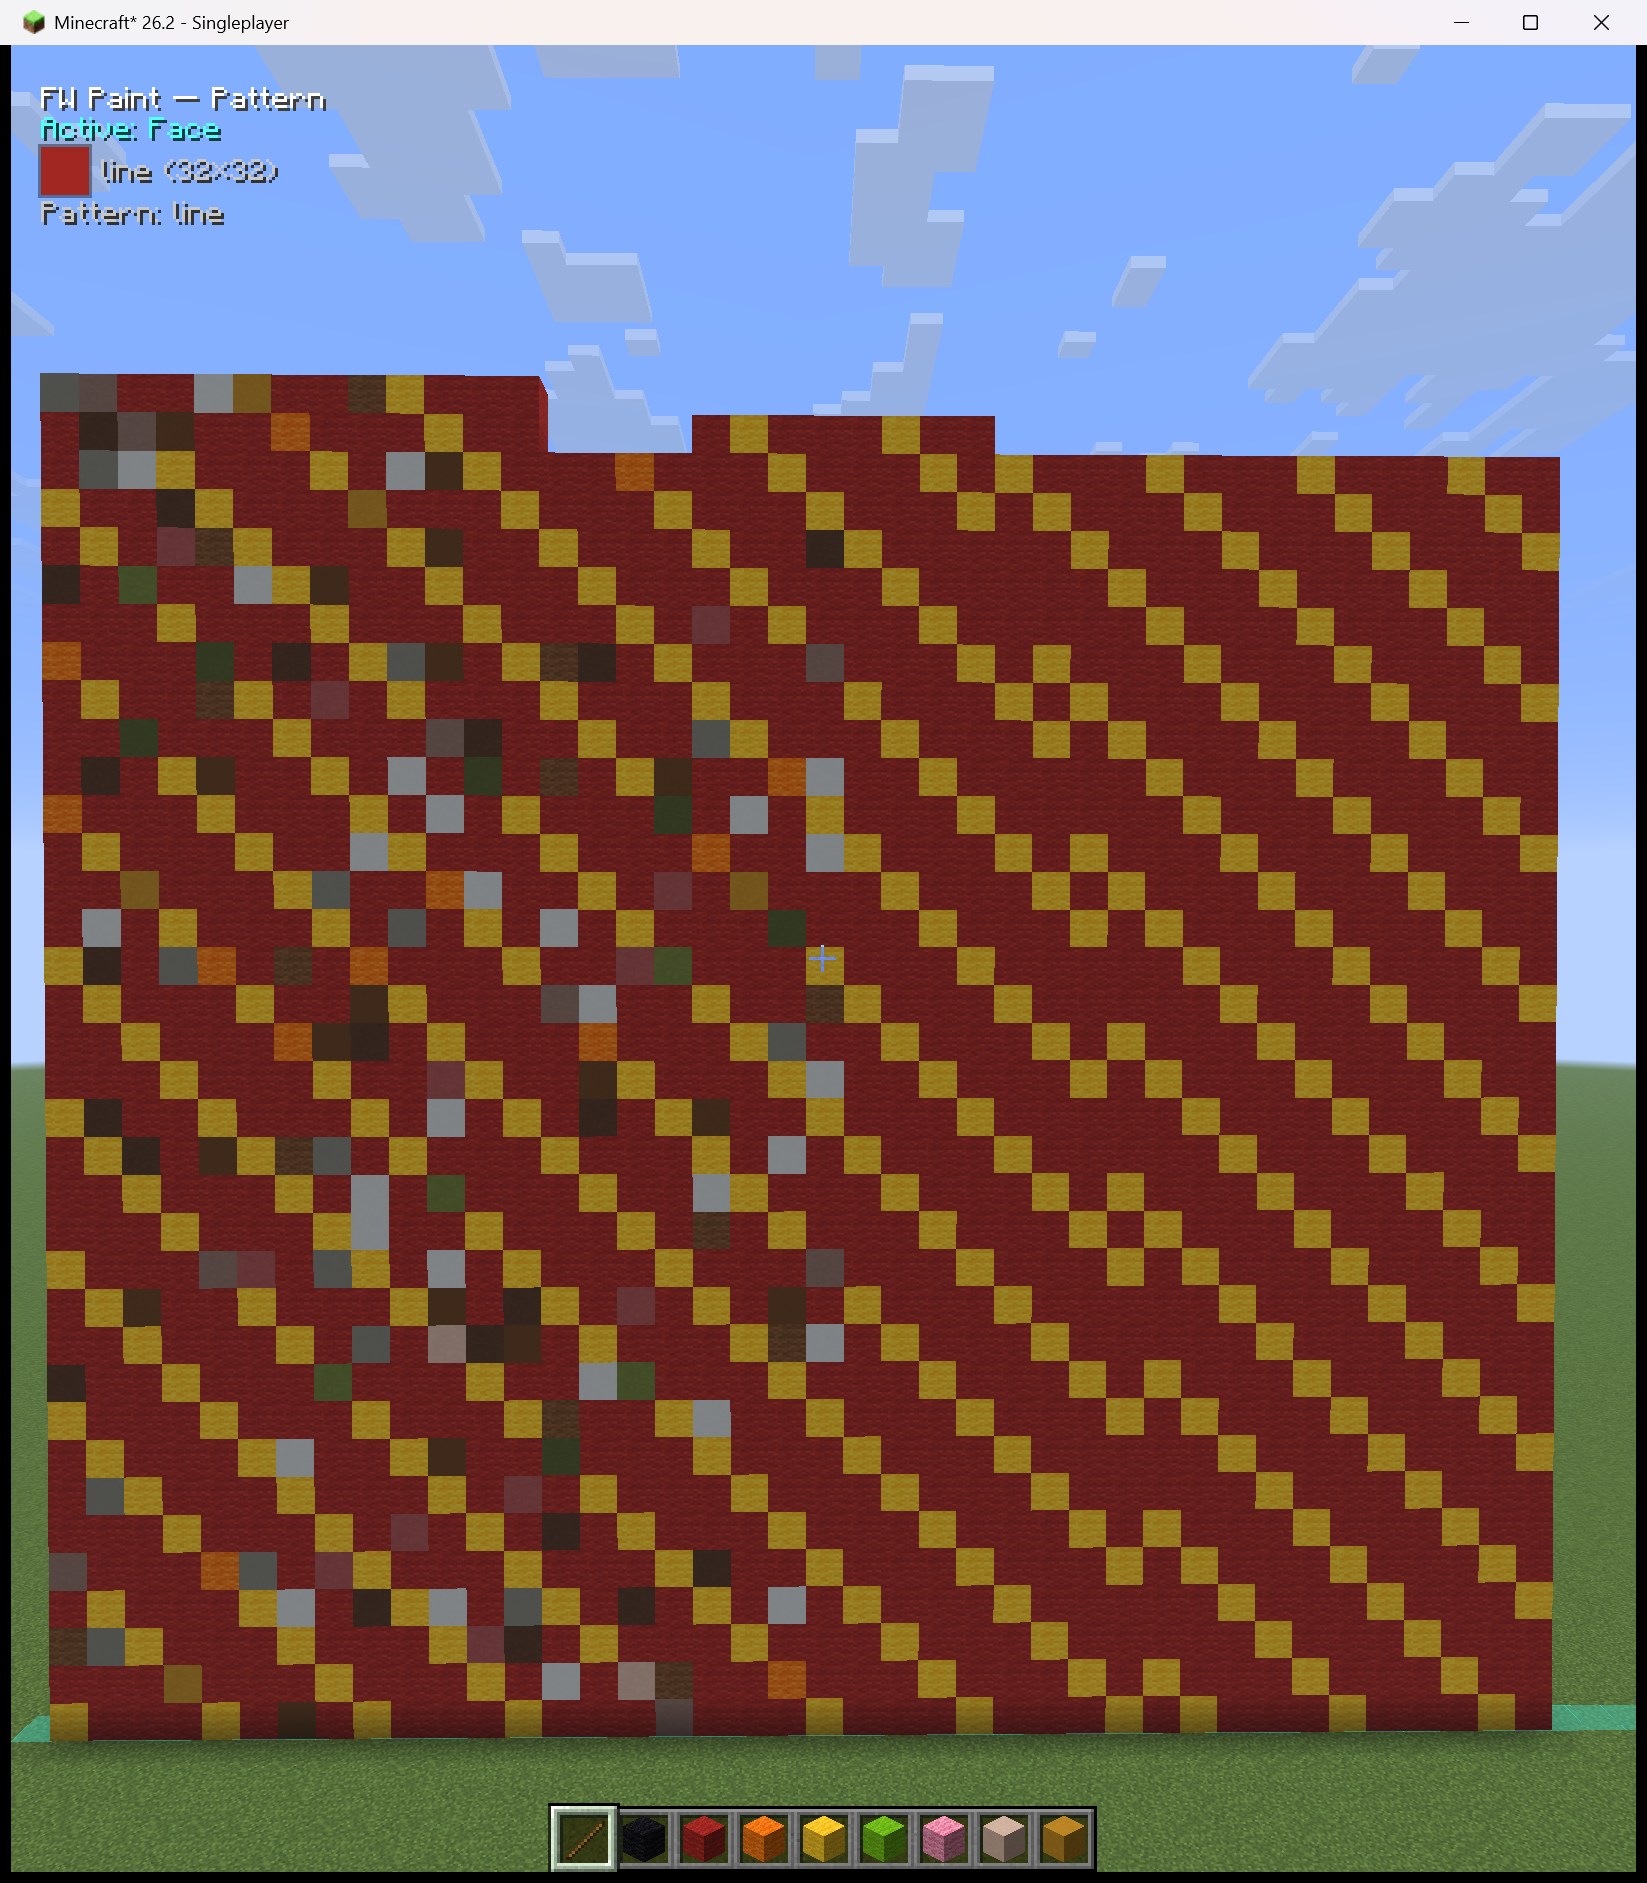
Draw a block grid by hand (up to 32×32) and paint it as a plane. + Pattern on the Palette tab opens the editor: left-click a block (its sprite rides your cursor), hold and scrub to draw — press a same-block cell to erase, Shift-drag for straight/45° lines, right-click to flood fill, middle-click to eyedrop, Ctrl-click to set where placement starts (empty cells are holes). A live iso preview (expandable) shows the wall, variance included; Start: Top/Bottom keeps ground-up painting upright. Painting advances out of the clicked face, the width crossing a plane snapped from your facing (45°/90°) — adjacent strokes continue the drawing instead of restarting, so you can build a patterned wall column by column. Tiling: none / sides / start–end / both. Patterns are their own paint type — B cycles your patterns while it's active.
Placement modes
Where blocks go, shared by all three paints. The green face tint + arrow previews every face the next click grows from, and rides the advancing fronts while you hold.
- Single — one column out of the clicked face; re-clicking continues from its first air gap.
- Face — the whole connected plane extrudes together: click a wall's top to raise it, its side to thicken it. A start marker behind the clicked column selects the connected marker group instead. Fill voids first (Settings) levels the lowest columns before stacking new layers.
- Face perp — a 1-block-wide run through the clicked block crossing your view (perpendicular to your look), snapped to 45° or 90° (the Perp snap setting) — diagonal stair-stepped lines included. Inside markers only the marked blocks along the run are selected.
- 3D Fill — a connected blob out of the clicked face; tap for the first shell, hold to grow. Contained by walls, end markers, and start-marker space.
- Everywhere: an end marker stops a column or fill even floating in air, and a finished column never resumes past it.
Markers
Turquoise starts and amber ends aim and bound every tool. They aren't real blocks: block markers reach to the Marker dist setting and the region markers (box, shapes) place and edit at sight range — far beyond block reach. Saved per world and dimension; Clear Markers (Settings) wipes them all, regions included.
- Marker — left-click starts, right-click ends; click-drag for straight axis-locked lines; starting on a marked block removes instead.
- Marker box — two clicks mark a whole region as ONE box: left-click the first corner (its face is the gradient START side), right-click the opposite corner (tinted turquoise/amber). Painting that begins inside the box stays inside; middle-click the box deletes it.
- Marker draw — a freehand pencil: sweep to spatter starts over whatever the crosshair touches, right-click for ends (auto ends scan along the stroke's starting face).
- Marker circle / Marker square — donut-ring regions: click a center (the clicked face sets the plane; that base plane is the gradient start side), then two radii — apart for a thick wall, equal for one-wide. Drag the blue controls to move/resize, drag a square's green corner nodes to rotate, right-click to extrude into a cylinder/tube (Ctrl = the other way), scroll while looking at the shape to slide it — or Ctrl+scroll to extrude up / unextrude down a layer per notch — and right-click to cancel a part-placed one. Look at any part of a shape and its edges turn white; a faint ghost outline shows through terrain, so a buried shape stays findable and editable. Painting into a shape is restricted to its band — giant gradient cylinders and square donuts with exactly the wall thickness you drew.
- Middle-click removes whatever marker you're aiming at — a shape, the box, or a plain block marker — in any mode, tool in hand.
- Clicking a marked block toggles it off in any marker mode; Ctrl clears its connected plane.
- Auto end marker (Settings) — each start scans out from the clicked face and marks the first non-air block (all air → max distance), with a blue face + arrow preview.
Gradient painting
The active palette blended along your build — between markers or free-hand.
- Between markers: mark a start and end, click the face the line runs out of and hold — the palette stretches start→end, Automatic segments anchoring to the real marker blocks.
- Anywhere else: the gradient grows out of the clicked face, sized by the palette's Sizing mode. Paint memory continues a half-finished gradient when re-clicked (cleared when you switch or edit palettes, or after the Settings idle timer); a finished gradient starts a fresh one on top.
- 3D gradients: sphere-ish blends from the centre out; each fill remembers its centre. 3D needs the strip to end in a real block (Auto at the start is fine).
- Honest ramps: running out of a palette block stops the paint with an "out of X" message — no silent substitutions.
Noise painting
A seedable 3D noise field: valleys get the top of your palette's strip, peaks the bottom — with the palette's noise type (Smooth / Perlin / Fractal), per-axis Scale, and Seed.
- Region fill: bound a region with start/end marker pairs, switch to 3D Fill, right-click an empty spot inside — the whole region floods at once. Or paint anywhere: Single / Face / 3D.
- The editor's noise cube previews it at real world coordinates starting at your feet — exactly what painting that spot would place. Drag a face to pan.
Solid tool
One kind of block through any mode. Left-click a block in the list to select it (again to clear), right-click to exclude it from the closest-match modes; the big preview shows your pick (or a ? when the mode decides at click time). Match: Selected block, Exact block (copies the clicked block), Closest colour / brightness (nearest inventory match, measured as the eye sees it — Oklab).
Finder tab
Every placeable block in the game ranked by colour — discover blocks beyond your inventory.
- Sort: Color — a rainbow (grays dark→light, then hue families) — or Brightness.
- Click a block to centre it among its nearest colour neighbours, or pick a pure colour in the hue/saturation field (+ brightness slider) — a coloured marker line shows where it falls. The target button re-centres after scrolling.
- Colours come from each block's actual textures — resource packs included.
Settings
- Placement, Marker dist, Auto end marker, Fill voids first, Paint memory — see above. Missing blocks: refuse to paint or skip absent segments. Color match: Perceptual (Oklab) or Classic.
- Move helper text… repositions the HUD lines with a live preview.
Requirements
- Minecraft 26.2 · Java 25 · pick your loader's file:
- Fabric — Fabric Loader 0.19.3+ and Fabric API for 26.2
- NeoForge — no other dependency
- Client-side only — nothing to install on the server.
- Placement sends normal "use block" interactions the server validates (Litematica-style); an aggressive anti-cheat may rate-limit very fast fills.
Open source (MIT) — github.com/nullabork/fw-paint-fabric
The FW Paint Team
